
This is the main documentation for building, installing, and running StegoTorus.
Building StegoTorus
Running StegoTorus
StegoTorus has two components: a server and a client. It also depends on Tor.
As a Client
Here is an overview of the processes running on the user’s machine:
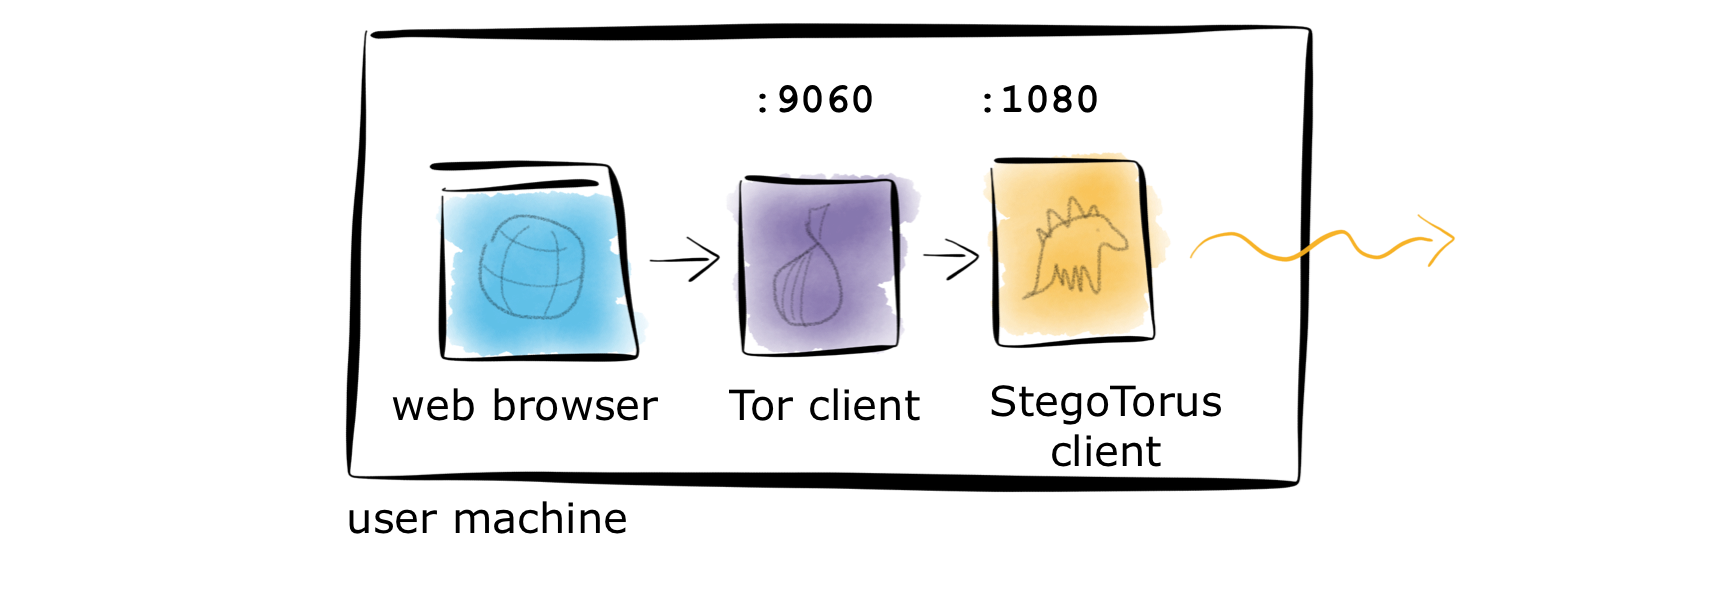
Running the StegoTorus client typically involves two processes started from the command line (so open two terminal windows) and then using the connection (either another command line or web browser configured with a SOCKS proxy at 127.0.0.1:9060. The order of commands is:
- Start StegoTorus client
- Clean Tor cache and start Tor client
- Browse the web using the Tor SOCKS proxy
Starting the Client
The client process needs to be configured to talk to a known StegoTorus server. We are maintaining two servers at 128.18.9.70:8080 (vm05) and 128.18.9.71:8081 (vm06). To use the latter, simply use the supplied configuration in the source tree:
$> ./stegotorus --config-file=modus_operandi/client-vm06-config.conf
Or, to use vm05, create a configuration file like seen below. You may adjust the settings as you see fit. Assuming that this configuration file is at /tmp/stegotorus-client.conf, start stegotorus from the source tree:
$> ./stegotorus --config-file=/tmp/stegotorus-client.conf
# simple client configuration file with 4 circuits

####################################
# protocol specification
####################################

protocol              chop                  # Currently either chop or null, and the null one has yet to do anything with the config file.
mode                  socks                 # Either socks, client, or server
up-address            127.0.0.1:1080        # Either the listen port (client or socks mode) or the bridge address (server mode)
down-address          128.18.9.70:8080 http
down-address          128.18.9.70:8080 http
down-address          128.18.9.70:8080 http
down-address          128.18.9.70:8080 http

####################################
# schemes selection
####################################

cookie-transmit   1
uri-transmit      1
json-post         1
pdf-post          1
jpeg-post         1
raw-post          0
swf-get           1
pdf-get           1
js-get            1
html-get          1
json-get          1
jpeg-get          1
raw-get           0

####################################
# chop options
####################################

trace-packets      1
persist-mode       1
shared-secret      bingoBedbug
disable-encryption 0
disable-retransmit 0

traces-dir         ./data/
images-dir         ./data/images/usenix-corpus-1953x1301-q30
pdfs-dir           ./data/pdfs

####################################
# process options
####################################

managed           0
daemon            0
#pid-file         /tmp/stego.pid
#log-file         /tmp/stego.log
log-min-severity  warn                  # Either debug, info, or warn

####################################
# stegonagraphic options
####################################

# a client POST of X will receive a reponse of X (useful for debugging)
post-reflection   0

# hostname: sent by the client as the value of the Host: <field>\r\n
hostname  stegororus.org

# jel knobs (jpegSteg)
#
# only the random_seed in not currently functional
#
jel-embed-length   0
jel-use-ecc        1
jel-ecc-blocklen   20
jel-freq-pool      8
jel-quality-out    75
jel-random-seed    666
Starting Tor
Once the StegoTorus client is running, we have to bootstrap Tor. First, we delete any Tor cache from prior runs:
$> rm -rf ~/.tor
We are using the Tor configuration file printed below. Assuming this file is called torrc, run the following command in a second shell:
$> tor -f torrc
If you prefer, you can specify all Tor options on the command line (or override them there):
$> tor SocksPort 9060 SocksListenAddress 127.0.0.1 SafeLogging 0 UseBridges 1 Bridge 128.18.9.71:8888 Socks4Proxy 127.0.0.1:1080 CircuitBuildTimeout 600
In either case, wait until you see the message “Bootstrapped 100%: Done” appear in the Tor output. This may take a short while.
SocksPort 9060  # what port to open for local application connections
SocksListenAddress 127.0.0.1  # accept connections only from localhost

SafeLogging 0

UseBridges 1
Bridge 128.18.9.71:8888
Socks4Proxy 127.0.0.1:1080  # this is the StegoTorus up-address

CircuitBuildTimeout 600  # allow more time to build circuits
Using the Connection
When Tor has bootstrapped completely, we can use another command line to test the connection, assuming that you have the program curl installed:
$> curl --socks4a 127.0.0.1:9060 https://check.torproject.org | grep Congrat
Or, point your browser to a proxy at the local SOCKS port 127.0.0.1:9060. In Firefox, for example, open Preferences and then choose the “Advanced” section, and then the “Network” tab. There, next to the Connection section, click on the “Settings…” button to open another dialog. In this dialog, choose a “Manual proxy configuration:” with a “SOCKS Host:” set to 127.0.0.1 and the “Port:” set to 9060 (or whatever Tor is configured to use). Choose “SOCKS v5” as the standard. You may want to add localhost, 127.0.0.1 into the text field for “No Proxy for:” setting as well.
As a Server
CAVEAT: To run a StegoTorus server, you will need a much larger set of trace files than what is currently distributed with our source code. To generate the bare minimum of
server.outfrom a file with suitable packet capture, refer to the section “Generating Payload” below.
For hosting a StegoTorus server at 128.18.9.70:8080, we use the following configuration file. It assumes that the server traces are located under /usr/share/stegotorus/traces/. The server may or may not be located on the same host as the Tor bridge that is used as an entry point into the Tor network. In the example here, we are using the Tor bridge running on the same host.
If this configuration file is located at /tmp/stegotorus-server.conf then we start the server using:
$> nohup ./stegotorus --config-file=/tmp/stegotorus-server.conf &
The server log is then found at /tmp/stego.log as configured.
####################################
# protocol specification
####################################

protocol              chop
mode                  server
up-address            127.0.0.1:8888   # this is the Tor bridge; could be on a different host
down-address          128.18.9.70:8080 http

####################################
# schemes selection
####################################

cookie-transmit   1
uri-transmit      1
json-post         1
pdf-post          1
jpeg-post         1
raw-post          1
swf-get           1
pdf-get           1
js-get            1
html-get          1
json-get          1
jpeg-get          1
raw-get           1

####################################
# chop options
####################################

trace-packets      1
persist-mode       1
shared-secret      bingoBedbug
disable-encryption 0
disable-retransmit 0

####################################
# process options
####################################

daemon            0
managed           0
pid-file          /tmp/stego.pid
log-file          /tmp/stego.log
log-min-severity  warn

traces-dir        /usr/share/stegotorus/traces/
images-dir        /usr/share/stegotorus/traces/images/usenix-corpus/1953x1301/q30-squashed
pdfs-dir          /usr/share/stegotorus/traces/pdfs
stream-dir        /usr/share/stegotorus/traces/images/stream

####################################
# stegonagraphic options
####################################

# a client POST of X will receive a response of X (useful for debugging)
post-reflection   0

# jel knobs (jpegSteg)
#
# only the random_seed in not currently functional
#
jel-embed-length   0
jel-ecc-blocklen   20
jel-freq-pool      8
jel-quality-out    75
jel-random-seed    666
Generating Payload
The client and server configuration allows fine-tuning of steganography schemes employed. Here we give some pointers on generating the appropriate cover traffic for both sides.
HTTP Steganography
We have added a small utility to generate your own payload if you want to use a different trace file client.out for HTTP steganography or if you wish to run your own StegoTorus server and need a server.out file to get going.
Find the source code under https://github.com/SRI-CSL/stegotorus/tree/master/payload_gen. Currently, this has been tested under Ubuntu 12.04 and Mac OS X 10.8.5 – newer version may work, too.
Assuming you are in the top-level directory of the StegoTorus source tree:
$> cd payload_gen
Before building successfully, you may have to install the developer libraries for libpcap like this:
$> sudo apt-get install libpcap-dev
The build:
$> make
If building was successful, you need to obtain a file with packet captures of a web browsing session. To generate this file yourself, you can do the following:
- Clear cache of your browser and quit
- Start packet capture:
$> sudo tcpdump -s 0 -i eth0 -w <file.pcap> tcp port http - Start browser and perform web browsing for a while; if you want to employ the PDF scheme, make sure to click on some PDF files
- Close browser and then
CTRL-Cpacket capture
Finally, run the binary built above on the now generated PCAP file:
$> ./payload_gen -r <file.pcap> "tcp and port 80"
This will generate 2 files client.out and server.out. Note that you will not be able to support full PDF or image steganography with only these HTTP traces.
PDF Steganography
For PDF steganography, StegoTorus obtains the pdf (cover) payloads from server.out for PDF GET, and from the pdfs-dir directory in your configuration file for PDF POST.
In other words, the output of the payload_gen tool above should be good for providing cover payloads for PDF GET. For PDF POST, you can crawl the Internet to download some pdf files and put them in the pdfs-dir directory.
Not all pdf’s can be used by StegoTorus (e.g., pdf’s involving features such as incremental updates cannot be parsed), but it would skip the ones that it cannot use.
Image Steganography
We use JPG image files for cover traffic. Simply crawl the web and download JPG files to the images-dir directory specified in your configuration file.
For using streams as cover, you would again save images to the stream-dir location as specified by the configuration file. But these images need to be called 0.jpg through 99.jpg as they mimic a webcam. They should all be the same quality. If you have a web cam, use that to generate these image files.