Introduction
Radler framework takes its inspiration from the Robot Operating System (ROS). In Radler framework, the sensors, controllers, and actuators are constructed from functional units called nodes. Each node executes independently with a period determined by a local clock and scheduling constraints. Radler supports a publish/subscribe architecture where nodes communicate by publishing on certain topics and subscribing to other topics.
Radler can generate executable code for both ROS1 and SROS2 with the intent that a significant part of the RADL specification and user code will remain the same or at least similar. The adoption of ROS2 is critical to the security properties of both communication channels and resource isolation, eliminating the need for a master node. The Radler codebase has been updated to be compatible with ROS1 on the master branch and ROS2 on the ros2 branch of the Radler repository at https://github.com/SRI-CSL/radler.
Getting Started
Find the documentation at https://sri-csl.github.io/radler/
To install
To checkout repository:
git clone https://github.com/SRI-CSL/radler.git
cd radler
git submodule update --init --recursive
To get Radler working on a clean version of Ubuntu 20.04:
sudo apt-get install cmake python3-pip
sudo pip3 install tarjan pyyaml pydot
To install ROS2 Foxy, follow the instructions from https://docs.ros.org/en/foxy/Installation.html
To install colcon, follow the instructions from https://colcon.readthedocs.io/en/released/user/installation.html
Sample Vagrantfile is available from https://github.com/SRI-CSL/radler/blob/ros2/examples/ardupilot/vagrant/Vagrantfile
To compile and run
Compile
Radler generates files from the RADL file into a usual ROS2 structure, then a call to colcon build will generate the executables as usual. (e.g., see examples/pubsub/pubsub.radl):
mkdir -p /tmp/ros2_ws/src
./radler.sh --ws_dir /tmp/ros2_ws/src compile examples/pubsub/single_machine/pubsub.radl --plant plant --ROS
cd /tmp/ros2_ws
colcon build
Run
The simplest way of running it is to source the ros2 workspace we just compiled and invoke it by name directly:
source install/local_setup.bash
./install/pubsub/bin/listener
./install/pubsub/bin/talker
You should see the output of the two nodes explaining that they are communicating. For more details see pubsub example documentation.
You can stop everything by typing Ctrl-C.
To test with Docker image
To build the radler/ros2 docker image:
apt-get install docker-buildx
export DOCKER_BUILDKIT=1
cd /path/to/radler/docker
docker build -t radler/ros2 .
To test pubsub example:
docker run --rm -i -t radler/ros2:latest talker
docker run --rm -i -t radler/ros2:latest listener
You should see the output of the two nodes explaining that they are communicating. For more details see pubsub example documentation.
You can stop everything by typing Ctrl-C.
To try SROS2 (https://github.com/ros2/sros2/blob/foxy/SROS2_Linux.md), start a container for both talker and listener nodes:
docker run --env-file sros_env.list --rm -i -t radler/ros2:latest bash
docker ps                               # to retrieve the CONTAINER_ID
docker exec -it CONTAINER_ID bash       # to get into the container's shell
Inside of the container, run listener and talker nodes with security feature on:
ros2 pkg executables                    # to check pkg/node available
ros2 run pubsub listener --ros-args --enclave /talker_listener/listener
ros2 run pubsub talker --ros-args --enclave /talker_listener/talker
To run the above talker_listener demo on two containers, start one container c1:
docker run --env-file sros_env.list --rm -i -t radler/ros2:latest bash
Inside of the container c1, prepare talker keys for SROS2 authentication and encryption:
tar zchvf talker.tgz sros2_keys/enclaves/talker_listener/talker
Start another container c2:
docker run --env-file sros_env.list --rm -i -t radler/ros2:latest bash
Copy talker keys from the container c1 to the container c2:
docker ps
docker cp c1_CONTAINER_ID:/root/talker.tgz .
docker cp talker.tgz c2_CONTAINER_ID:/root/
Inside of the container c2, untar talker keys and run talker node:
tar zxvf talker.tgz
ros2 run pubsub talker --ros-args --enclave /talker_listener/talker
Inside of the container c1, run listener node:
ros2 run pubsub listener --ros-args --enclave /talker_listener/listener
Radler usage
Commands
radler.sh
radler.sh is a simple bash script used to run the actual python Radler script radler/main.py
Radler script
The script may be used to handle object files with the subcommands
obj_version and obj_compatible or to compile .radl description
with the compile subcommand. The script has two levels of arguments.
The arguments before the subcommand and the one after, specific to the
subcommand.
Generic arguments
The full list of arguments is provided by the --help argument.
--ws_dir
This is used to specify where is the workspace directory. The
workspace directory is where the files are generated. This is by
default equal to src.
Compile subcommand
The full list of arguments for the compile subcommand is available
as the --help argument to the subcommand
(radler.sh compile --help).
The radl description file is a positional compulsory argument. It has to be a file with the ‘.radl’ extension.
--object_files
To compile .radl description which depends on other modules, one has to give the object files of those modules with this argument.
--object_dest
By default, the generated object file has the same name as its module, with the ‘.radlo’ extension. Moreover it is by default written at the root of the workspace directory. This command can be used to change the name and directory of the generated object file.
Examples
The following examples demonstrate the features of Radler, which work with both ROS (master branch) and ROS2 (ros2 branch).
Pubsub: How to write pub/sub on single/multi machine
House_thermo: Toy example of a distributed house heating system modeling
Controller_gateway: How to write a gateway to forward back and forth messages between Radler world and a local sandboxed ROS
ArduPilot: Advanced Fail Safe of Arducopter using MAVROS
PVS: How to use PVS2C-generated codes in the step function
The following examples work with ROS (master branch).
Drone: AR.Drone demos using ardronelib sdk and ardrone_autonomy ROS driver
Raspberrypi: Raspberry Pi 2/B+ demo using GPIO
Android: Android demos via ROS-enabled Android application and Android NDK
Pubsub
This simple examples demonstrate how to write pubsub on single/multi machine.
To generate the files from the .radl description, do:
mkdir -p /tmp/ros2_ws/src
cd /path/to/radler
./radler.sh --ws_dir /tmp/ros2_ws/src compile examples/pubsub/single_machine/pubsub.radl --plant plant --ROS
cd /tmp/ros2_ws
colcon build
You can then run all of them (in different terminals for more clarity):
source install/local_setup.bash
./install/pubsub/bin/listener
./install/pubsub/bin/talker
For multi_machine testing, use a different .radl file with modified plant section to list IPs for each machine in multi_machine directory as below:
./radler.sh --ws_dir=/tmp/ros2_ws/src compile examples/pubsub/multi_machine/pubsub.radl --plant plant --ROS
On machine 1:
source install/local_setup.bash
./install/pubsub/bin/talker
On machine 2:
source install/local_setup.bash
./install/pubsub/bin/listener
Room Temperature Regulation
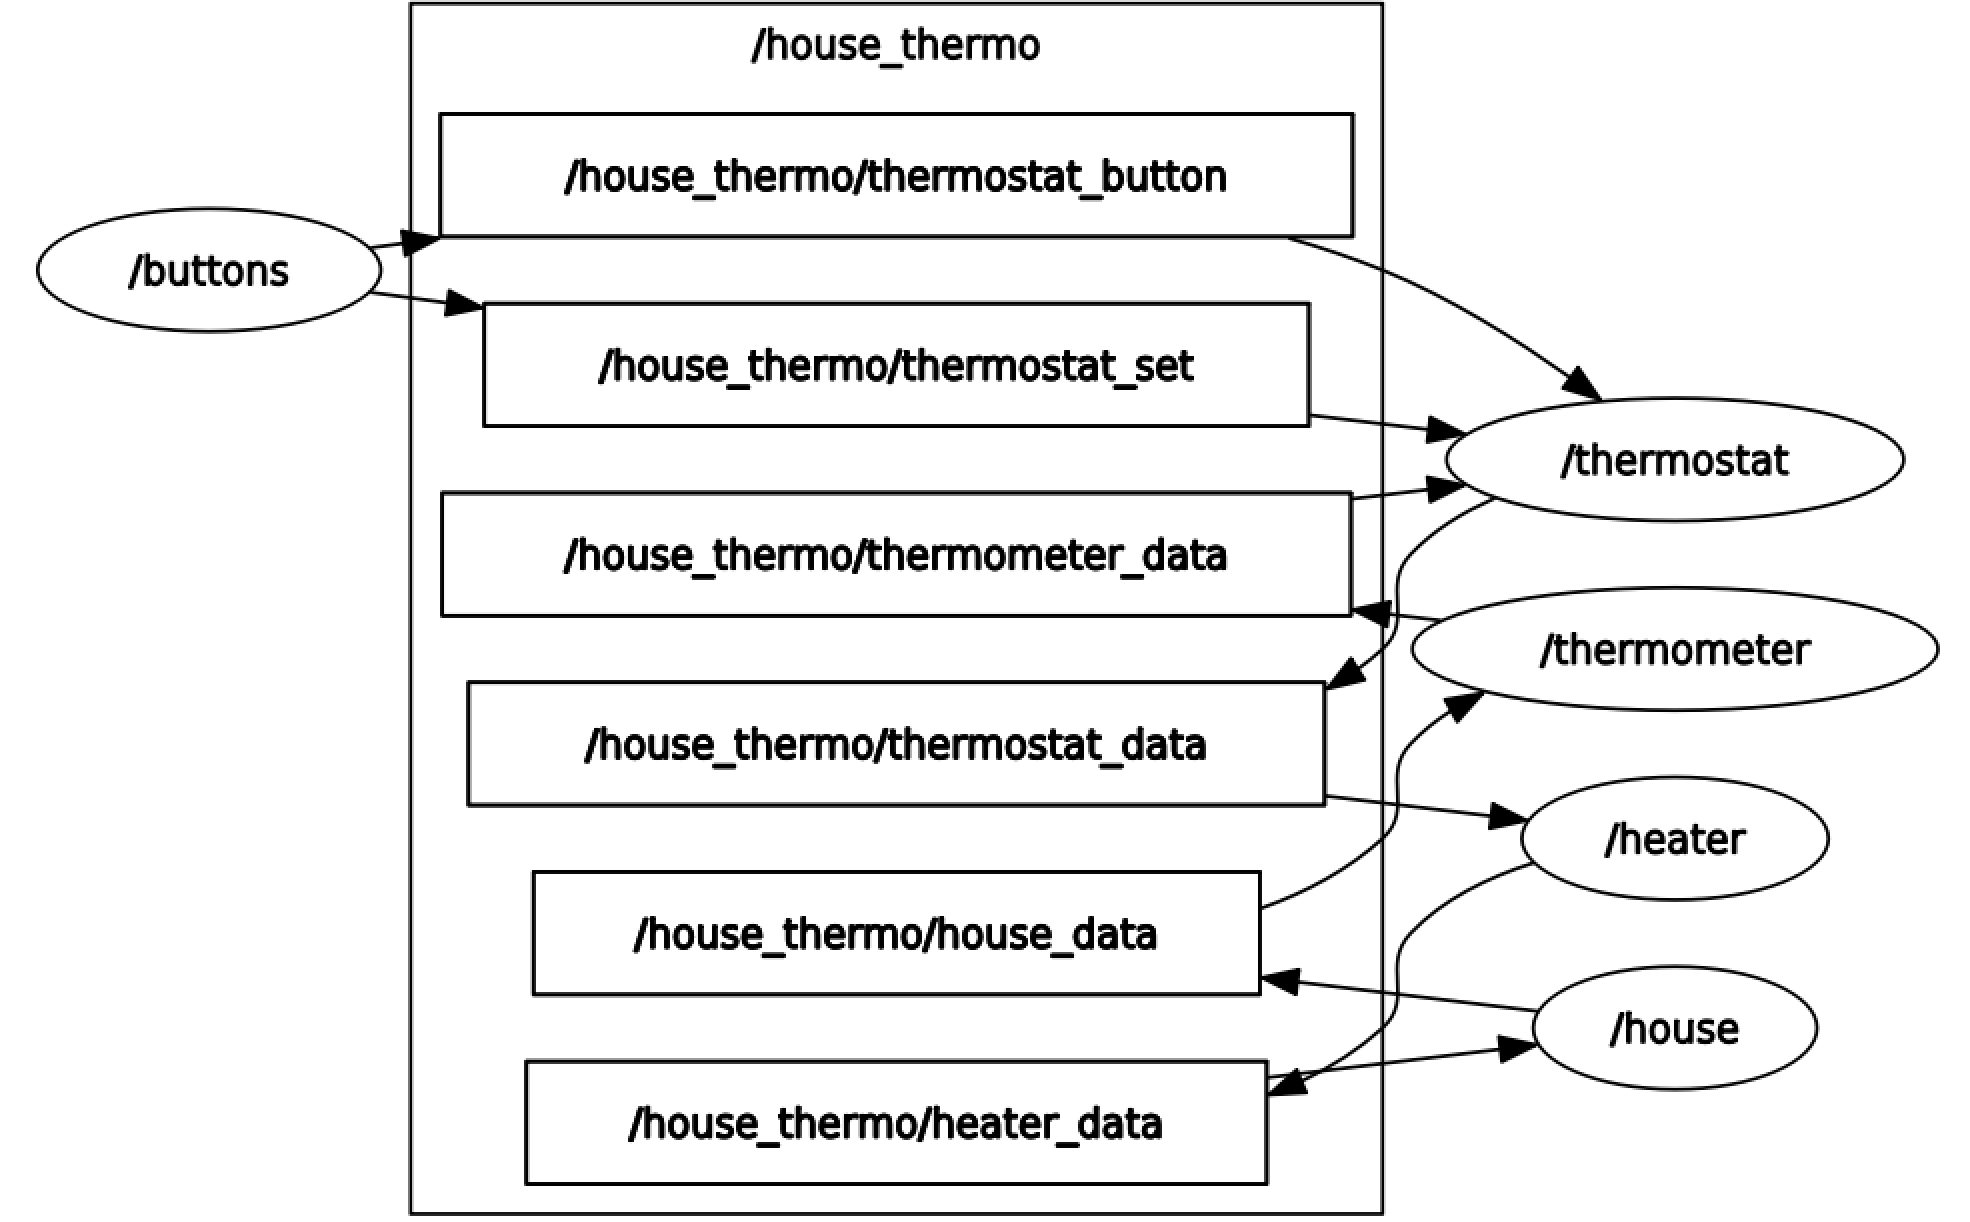
Five nodes (in ellipse) communicate through six topics (in rectangle).
The button node publishes to thermostat_button and
thermostat_set topics to generate signals that control the behavior
of thermostat by means of switching on/off and setting the target
temperature, respectively. The thermostat node subscribes from
thermostat_button, thermostat_set, thermometer_data topics
and publishes to thermostat_data topic to regulate a room
temperature within min/max. The thermometer node subscribes from
house_data topic and publishes to heater_data topic to measure
the room temperature with sensing noise. The heater node is the
actuator that subscribes from thermostat_data and publishes to
heater_data. The house node provides the physical room
temperature by subscribing from heater_data and publishing to
house_data while the thermometer node provides the digital
sampled sensed temperature. A system consisting of these nodes was
defined in a RADL description with user code in each step function. The
Radler build process generates the glue code for scheduling,
communications, and failure detections for executables.
At the logical level, there are two main value types; node and topic. Excerpt from the example system’s RADL description below:
basic_rate : duration 50msec

thermometer_data : topic { FIELDS temp : float32 75 }
thermostat_button : topic { FIELDS status : bool true }
thermostat_set : topic { FIELDS temp : float32 75 }

thermostat_data : topic { FIELDS switch_on : bool true }

thermostat : node {
  SUBSCRIBES
    thermometer_temp { TOPIC thermometer_data MAXLATENCY 1msec }
    thermostat_switch { TOPIC thermostat_button MAXLATENCY 1msec }
    thermostat_set_temp { TOPIC thermostat_set MAXLATENCY 1msec }
  PUBLISHES
    heater_switch { TOPIC thermostat_data }
  PATH "src"
  CXX
    { HEADER "thermostat.h" FILENAME "thermostat.cpp" CLASS "Thermostat" }
  PERIOD basic_rate
}
A node is described with fields such as PERIOD, PUBLISHES, and
SUBSCRIBES. When the thermostat node is created, Radler
constructs one instance of the provided C++ class specified in the
CXX field. The step function of this instance will be called at a
fixed frequency defined by the node’s period (the PERIOD field). At
each call, the step function is provided with the messages received from
its subscriptions and is required to write the messages that it has to
publish (the SUBSCRIBES and PUBLISHES fields). A topic is
uniquely defined by its name. For example, thermometer_data,
thermostat_button, thermostat_set topics are referenced as
thermometer_temp, thermostat_switch, thermostat_set_temp,
respectively. The thermostat node publishes to the
thermostat_data topic referenced as heater_switch and heater
node subscribes from it. A topic is a purely logical way of defining
point-to-point communications between one producer and multiple
consumers. That is, there can be exactly one node publishing to a topic
(e.g., house_data) while many nodes (e.g., thermometer_1 …
thermometer_n in case of multiple sensors) can subscribe from it.
The communication occurs via bounded latency channel (the MAXLATENCY
field) for each topic.
Below code segment shows the step function of the thermostat node,
that is provided by the user (C++ class specified in the CXX field
under the directory specified in the PATH field, as being
exemplified in the RADL description above).
void Thermostat::step(const radl_in_t* in, const radl_in_flags_t* inflags,
                      radl_out_t* out, radl_out_flags_t* outflags)
{
  // change the set temperature
  this->set_temp = in->thermostat_set_temp->temp;

  // set the status
  this->status = in->thermostat_switch->status;

  // decide whether to switch on the heater
  if (in->thermometer_temp->temp > (this->set_temp + this->tol)) {
    out->heater_switch->switch_on = false;
  } else if (this->status && (in->thermometer_temp->temp < this->set_temp)) {
    out->heater_switch->switch_on = true;
  } else {
    out->heater_switch->switch_on = this->status;
  }
}
A class will be instantiated with the default constructor to generate an
instance representing the state of the Mealy machine. Subsequently, the
step function of this instance will be called to execute one step of the
machine. The signature of the step function should specify the input
(radl_in_t*) and output (radl_out_t*) structures define the
node’s subscription and publication, respectively. In the example, the
step function of the thermostat node regulates the room temperature
by switching on/off state of the heater. The flag structures
(radl_inflags_t*, radl_outflags_t*) can be used to check if a
subscription, e.g., thermometer_temp, is stale or timeout by calling
radl_is_stale(iflag->thermometer_temp) or
radl_is_timeout(iflag->thermometer_temp), respectively. These
Boolean metadata attached to messages are by default propagate through
nodes unless the explicitly being turned off (radl_turn_off).
A physical specification is provided by a value of type plant:
sys1 : linux {
  IP 192.168.1.201
  NODES heater
}

sys2 : linux {
  IP 192.168.1.202
  NODES thermostat
}

sys3 : linux {
  IP 192.168.1.203
  NODES thermometer house buttons
}

plant : plant {
  MACHINES
    house_heater { OS sys1 }
    house_computer {
      OS l1 : lynxsecure {
        VMS
          vm1 { OS sys2 }
          vm2 { OS sys3 }
      }
    }
}
The MACHINES field lists the machines that will be used by the
system. In the example, three machines are defined by the operating
system that it runs (the OS field). The IP and NODES fields
specify the IP address assigned for the OS and the nodes that run on the
OS. In the example, three nodes (i.e., thermometer, house,
buttons) run on the Linux with IP address of 192.168.1.203 while
heater and thermostat nodes run on a separate Linux machine.
Controller_Gateway
This example demonstrates how to write a gateway to forward back-and-forth messages between Radler world and a local sandboxed ROS.
Radler world is defined in the radl_files folder. It consists of .radl description containing three nodes. A device stub publishing an integer, an actuator stub subscribing to a float and a gateway node for an external controller node, forwarding device msgs to it and forwarding actuators msgs from it.
To complete the example, a stub of a sandboxed ROS controller node is also provided in the sandboxed_ros_controller folder.
There are basically two interesting files, the gateway.radl description of Radler system which defines the gateway node and the associated gateway.h file implementing the actual gateway.
To generate the files from .radl description, do:
mkdir -p /tmp/ros2_ws/src
cd /path/to/radler
./radler.sh --ws_dir /tmp/ros2_ws/src compile examples/controller_gateway/radl_files/gateway.radl --ROS
Then to compile everything and get ROS executables, do:
ln -s /path/to/radler/examples/controller_gateway/sandboxed_ros_controller /tmp/ros2_ws/src
cd /tmp/ros2_ws
colcon build
You can then run all of them (in different terminals for more clarity):
source install/local_setup.bash
./install/gateway/bin/device_node
./install/gateway/bin/actuator_node
./install/gateway/bin/controller_gateway
./install/sandboxed_ros_controller/bin/sandboxed_ros_controller_node
Advanced Fail Safe of Arducopter using MAVROS
This demo shows the Radler code generation and its execution on SITL (software in the loop) simulator for the Arducopter advanced fail safe. In this demo MAVROS, ROS-based extendable communication node, on the companion computer communicates with ground control system.
Radler architecture consists of the logical and physical parts. The logical part is specified in terms of node and topic similar to ROS. The nodes execute independently and periodically, and subscribe from and publish to topics. For example, battery node executes its step function with period of 100 milli seconds, subscribes from battery status topic, and publishes to mode change topic. Physical parts map nodes to the process on specific machines, in this case companion computer. The step function of battery node controls mode to return to takeoff location when battery level below threshold. The step function of gateway node forwards back-and-forth messages between Radler and ROS worlds on the companion computer. Radler build process generates the glue code for scheduling, communication, and failure detection such as timeout or stale.
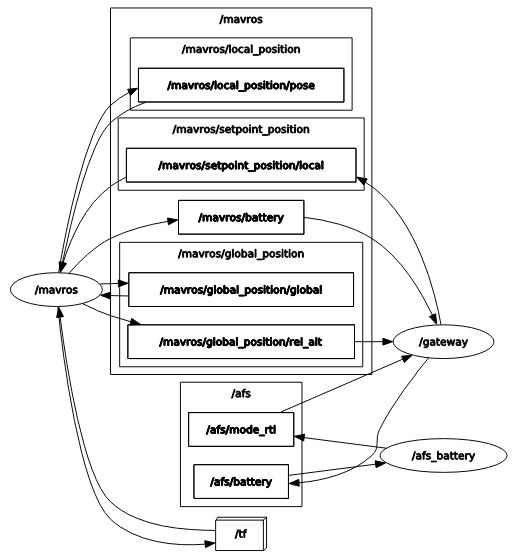
The above graph shows the nodes and topics used in this demo. Note that we are using ROS service to change the flight mode which is not shown here. Also gateway subscribes from the relative altitude topic which will be used for another Radler node for altitude-related control such as altitude hold.
More information on Ardupilot can be found from ArduPilot Development Site https://ardupilot.org/dev/index.html.
Set up the SITL/MAVROS/Radler in a virtual machine environment using Vagrant.
git clone https://github.com/ArduPilot/ardupilot.git
cd ardupilot
cp /path/to/radler-ros2-branch/example/ardupilot/vagrant/Vagrantfile .
vagrant up
vagrant ssh
cd /vagrant
git submodule update --init --recursive
exit
Start SITL simulator.
vagrant ssh -c "sim_vehicle.py -v ArduCopter --console --map -m --out=127.0.0.1:14550"
If you encounter the DISPLAY error (e.g., xterm: Xt error: Can’t open display: 0.0), edit the /etc/ssh/sshd_config file.
X11Forwarding yes
If you encounter the following error:
Connect tcp:127.0.0.1:5760 source_system=255
Failed to connect to tcp:127.0.0.1:5760 : [Errno 111] Connection refused
Consider adding a delay before starting mavproxy. The -N option below skips the build. More options can be found in the /vagrant/Tools/autotest/sim_vehicle.py file.
sim_vehicle.py -v ArduCopter --console --map -m --out=127.0.0.1:14550 -N -d 5
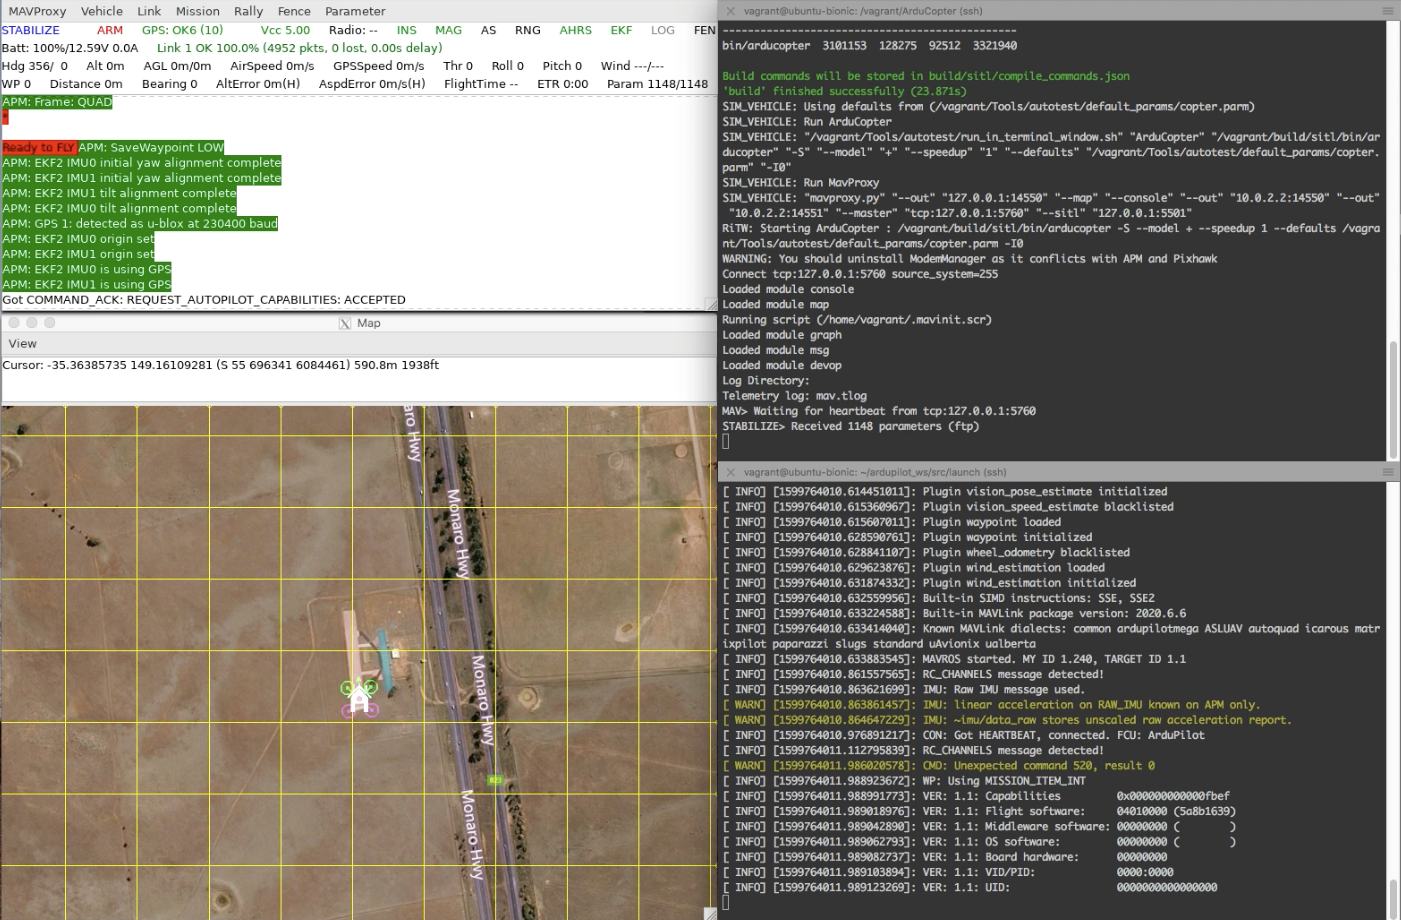
Connect MAVROS with SITL.
vagrant ssh -c "ros2 launch mavros apm.launch.py"
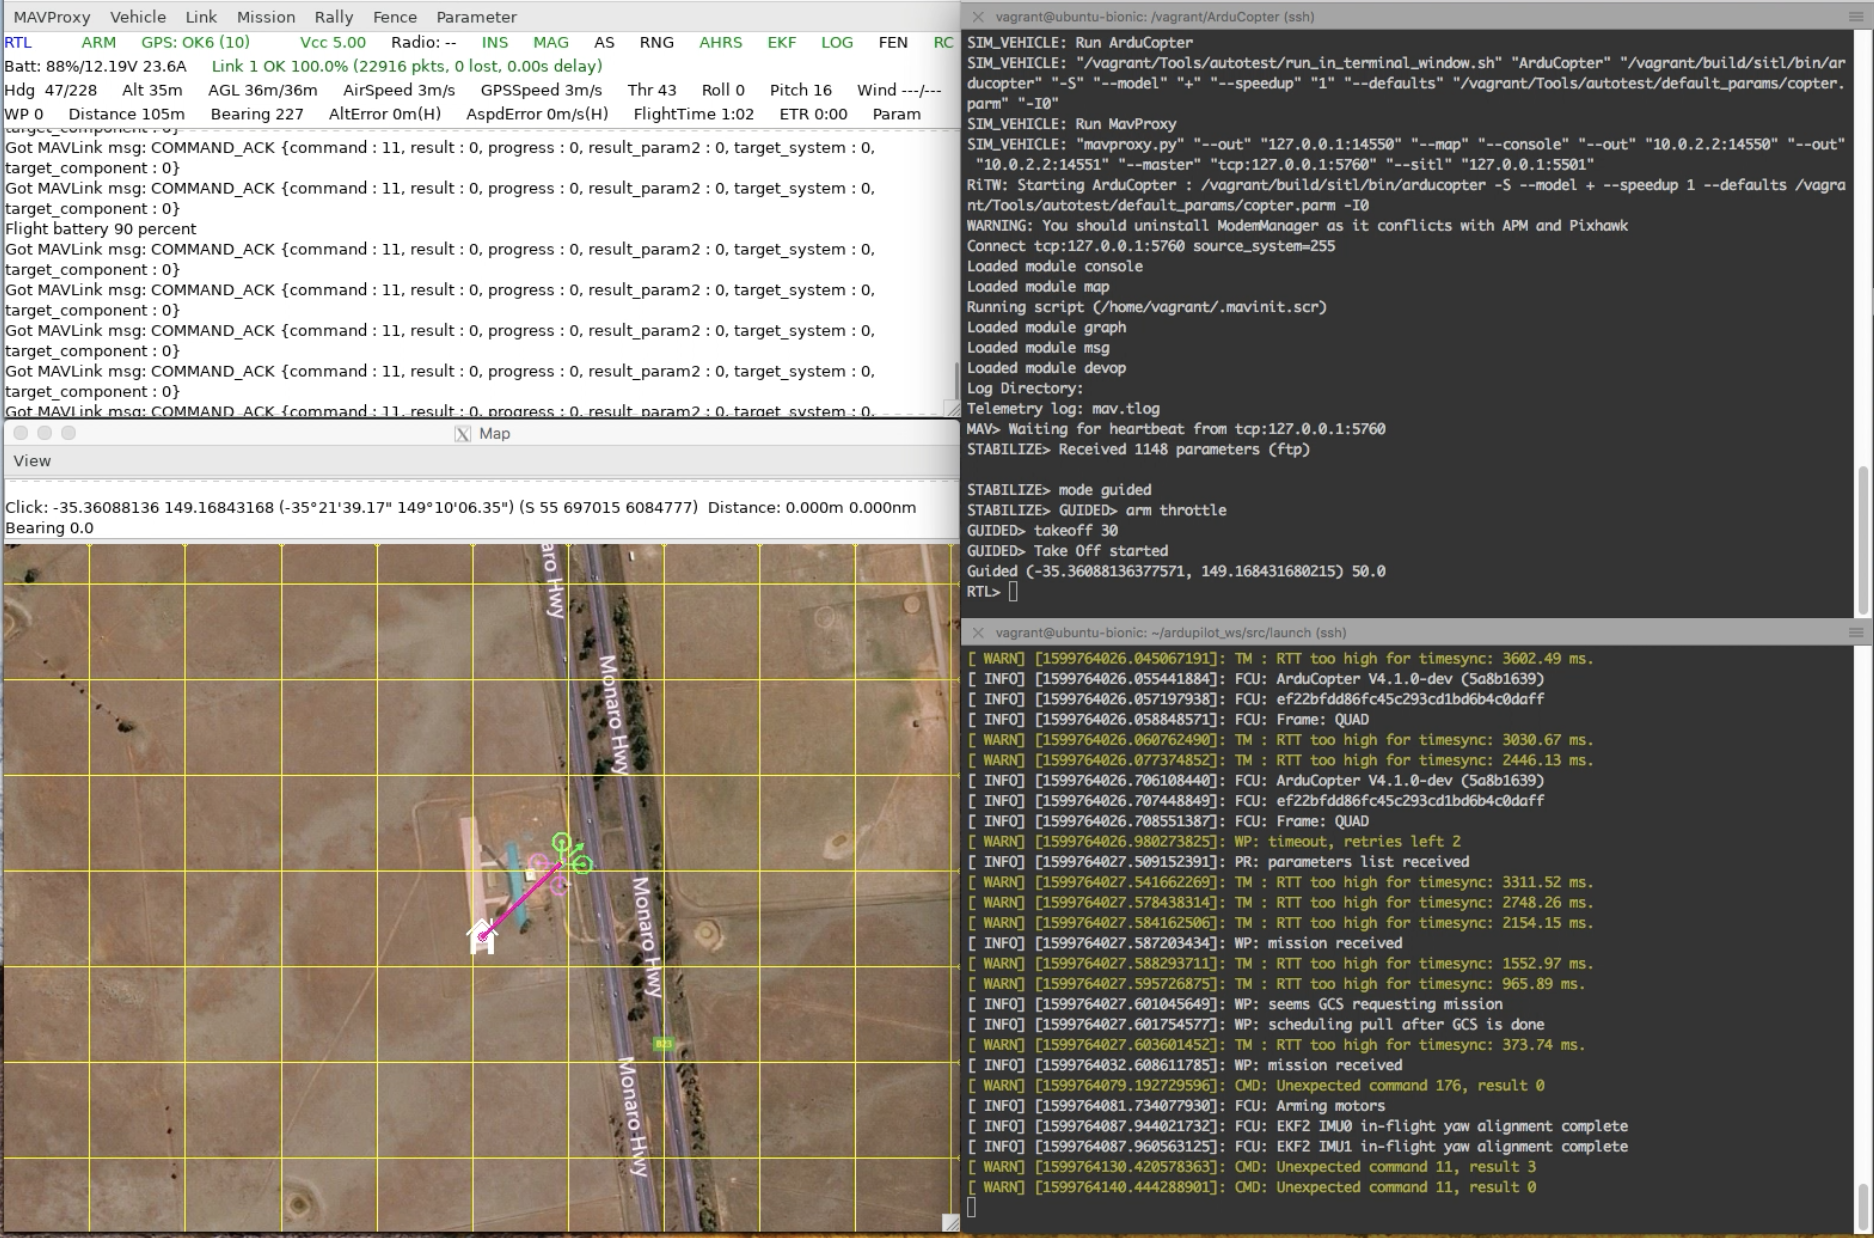
Left two windows of the below snapshot show the ground control console and map of the environment launched from the SITL simulator on the top right window. On the right bottom window, one can observe some verbose that reads the Arducopter’s configuration, which indicates a connection.
Launch Radler nodes (in different terminals for more clarity). The battery status topic published in the ROS side is subscribed by the gateway node which forwards it to the battery node on the Radler side via Radler pub/sub channel.
vagrant ssh -c "source ~/ros2_ws/install/local_setup.bash; ~/ros2_ws/install/afs/bin/gateway"
vagrant ssh -c "source ~/ros2_ws/install/local_setup.bash; ~/ros2_ws/install/afs/bin/afs_battery"
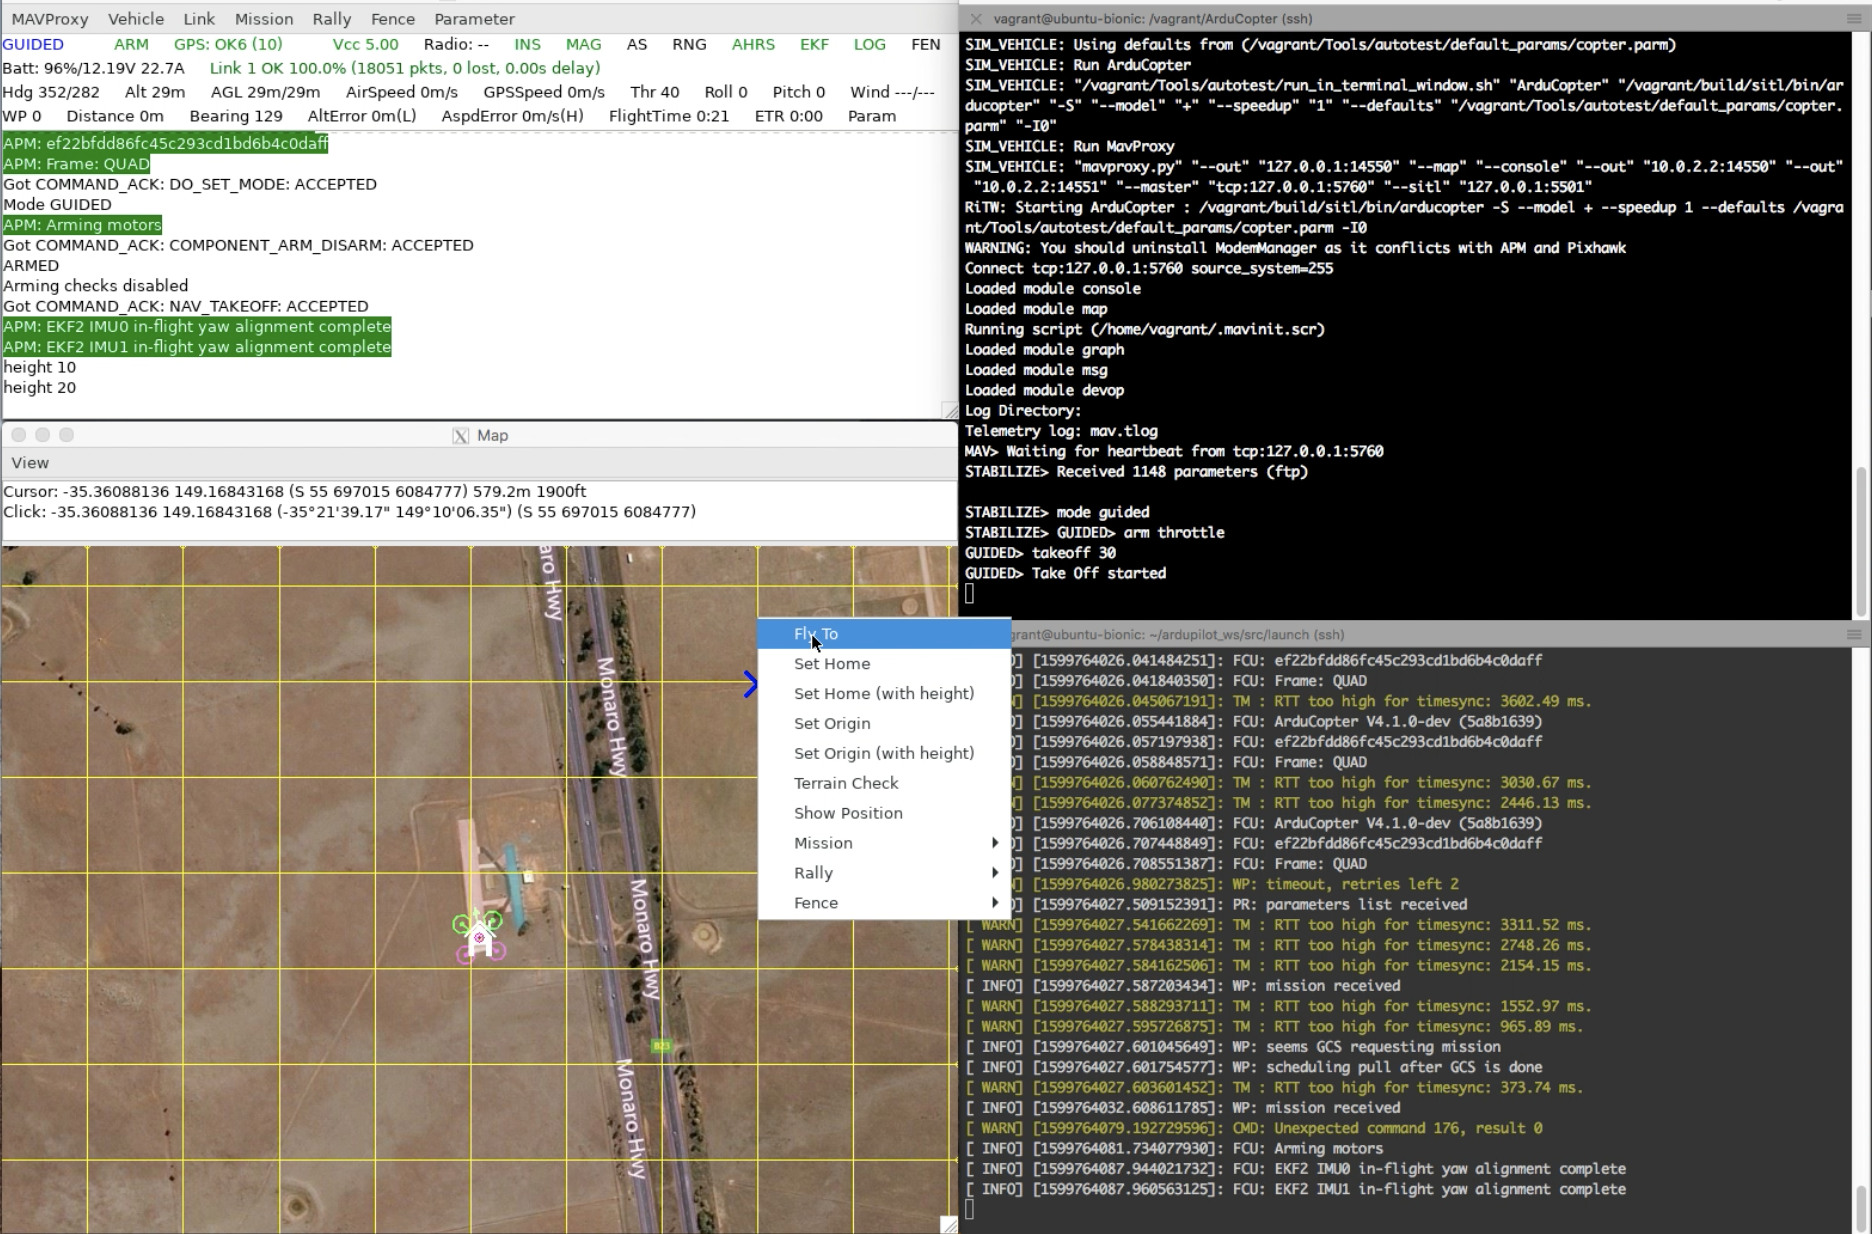
On the simulator side (upper right window of below snapshot), change the Arducopter’s mode to GUIDED, arm throttle, then takeoff to an altitude (e.g., 30 meters) and one can observe the console window changing battery level and altitude.
mode guided
arm throttle
takeoff 30
On the map (bottom left window), create a target position with altitude (or simply use a command position x y z), then observe the Arducopter flying to the target.
When the battery level hits below threshold (i.e., 90%) the mode change to return to takeoff location is published by battery node. The gateway node subscribes from it and calls ROS service to set custom mode of the Arducopter. Note that the mode change to RTL on the simulator side. The battery level can also be checked with the command bat on the console, and can be reset with the command batreset.
On the map window of below snapshot, one can observe that the Arducopter heading to the takeoff location.
The altitude value on the ground control console indicates that the Arducopter landing to the takeoff location.
For the inception of Java code in the step function, we provide a use-case with Java Native Interface (JNI). The step function of esp (event stream processing) node calculates point distance between two successive (x,y) positions. BeepBeep (https://liflab.github.io/beepbeep-3/) is used for event stream processing engine. We modified BeepBeep code example of PointDistance given in https://liflab.github.io/beepbeep-3-examples/_point_distance_8java_source.html. The afs.radl includes cmake_library information for JNI. JVM creation should be in the class constructor (refer afs_esp.h) and JNI calls in the step function (refer afs_esp.cpp).
To install BeepBeep 3 examples:
vagrant ssh
cd ~
git clone https://github.com/liflab/beepbeep-3-examples.git
cd beepbeep-3-examples
edit config.xml
  <zip>https://github.com/liflab/beepbeep-3-palettes/releases/download/v20181124/beepbeep-3-palettes-v20181124.zip</zip>
  to
  <zip>https://github.com/liflab/beepbeep-3-palettes/releases/download/v20190917/beepbeep-3-palettes-v20190917.zip</zip>
ant download-deps
mkdir -p Core/src
mkdir doc
ant
To compile Java-side code, CLASSPATH should include the above beepbeep-3-examples.jar (refer ./vagrant/setup.bash):
cd ~/radler/examples/ardupilot/jni
javac PointDistance.java
To run, CLASSPATH should include beepbeep-3-examples.jar and /path/to/radler/examples/ardupilot/jni (refer ./vagrant/setup.bash):
source ~/ros2_ws/install/local_setup.bash
cd ~/ros2_ws/install/afs/bin
./afs_esp
If DAIKON invariant detector (https://plse.cs.washington.edu/daikon/) is enabled in afs.radl, .dtrace.gz file will be created in ~/ros2_ws/install/afs/bin directory.
We utilize Apache Log4j 2 (https://logging.apache.org/log4j/2.x/) for logging purpose. Refer ./jni/log4j2.properties for log4j2 properties to configure RollingFileAppender and to disable JNDI lookup.
source ~/ros2_ws/install/local_setup.bash
cd ~/ros2_ws/install/afs/bin
./afs_log
The RollingFileAppender in Log4j will create afs.log file in ~/ros2_ws/install/afs/bin directory to backup the altitude information.
To regenerate and recompile from the RADL file:
cd ~/radler
./radler.sh --ws_dir ~/ros2_ws/src compile examples/ardupilot/afs.radl --plant plant --ROS
cd ~/ros2_ws
colcon build --cmake-args -DSECURITY=ON --no-warn-unused-cli --symlink-install
Demo with SROS2
To generate a keystore, keys and certificates (refer ./vagrant/sros_keystore.bash):
cd ~/ros2_ws
ros2 security create_keystore sros2_keys
ros2 security create_key sros2_keys /afs/mavros
ros2 security create_key sros2_keys /afs/gateway
ros2 security create_key sros2_keys /afs/afs_battery
ros2 security create_key sros2_keys /afs/afs_esp
ros2 security create_key sros2_keys /afs/afs_log
To define the SROS2 environment variables (refer ./vagrant/sros_env.bash):
export ROS_SECURITY_KEYSTORE=/home/vagrant/ros2_ws/sros2_keys
export ROS_SECURITY_ENABLE=true
export ROS_SECURITY_STRATEGY=Enforce
export RMW_IMPLEMENTATION=rmw_fastrtps_cpp
To launch MAVROS with SROS2:
ros2 launch mavros apm_sros2.launch.py
To run each node such as gateway node (refer ./vagrant/sros_env.bash):
source ~/ros2_ws/install/local_setup.bash
source ~/radler/examples/ardupilot/vagrant/sros_env.bash
ros2 run afs gateway --ros-args --enclave /afs/gateway
Security access controls are defined in permissions.xml file. To demonstrate a policy which only allows gateway node publishing messages on the specific topics such as those in afs.radl file:
cd ~/ros2_ws/sros2_keys/enclaves/afs/gateway
edit <publish><topics> part of permissions.xml
  replace
    <topic>rt/*</topic>
  with
    <topic>rt/afs/rel_alt</topic>
    <topic>rt/afs/global_position_local</topic>
    <topic>rt/afs/battery</topic>
    <topic>rt/parameter_events</topic>
    <topic>rt/rosout</topic>
    <topic>*/gateway/*</topic>
To sign a new policy file permissions.p7s from the updated XML file permissions.xml:
openssl smime -sign -text -in permissions.xml -out permissions.p7s --signer permissions_ca.cert.pem -inkey ~/ros2_ws/sros2_keys/private/permissions_ca.key.pem
With the updated permissions, remapping the battery topic will fail.
ros2 run afs gateway --ros-args --enclave /afs/gateway --remap /afs/battery:=/afs/not_battery
Demo with PVS2C-generated Code
This demo shows how to use PVS2C-generated codes in the step function. The src directory contains the code generated by PVS2C from the *.pvs files formalizing AES encryption/decryption with a proof of the invertibility of AES. The PVS files are included for reference, but they would require the “strings” branch of the development version of PVS from https://github.com/SRI-CSL/pvs as well as the NASA PVSLib library from https://github.com/nasa/pvslib. The .c and .h files generated from the PVS prelude theories and the ones in the directory. The C files depend on the GMP library being available as well as standard libraries such as stdio, stdlib, inttypes, stdbool, stdarg, string, fcntl, math, sys/mman, sys/stat.h, and sys/types.
sudo apt-get install libgmp3-dev
cd /path/to/radler/examples/pvs/src
cc -O3 -Wall -shared -o libRijndael.so pvslib.c finite_sequences_c.c integer_bv_ops_c.c bv_c.c bit_c.c file_c.c bytestrings_c.c gen_strings_c.c strings_c.c ordinals_c.c ordstruct_adt_c.c integertypes_c.c exp2_c.c euclidean_division_c.c real_defs_c.c Rijndael_c.c bytevectors_c.c hex_c.c simplifications_c.c Rijndael_m.c -lgmp -fPIC
sudo mv libRijndael.so /usr/lib/x86_64-linux-gnu/
To compile and execute:
cd /path/to/radler
./radler.sh  --ws_dir /tmp/ros2_ws/src compile examples/pvs/aes.radl --plant plant --ROS
cd /tmp/ros2_ws
colcon build
source source install/setup.bash
./install/aes/bin/Rijndael
./install/aes/bin/Consumer
To test the generated C code at a shell (Refer src/README for the sample run.):
cd /path/to/radler/examples/pvs/src
cc -O3 -Wall -o Rijndael pvslib.c finite_sequences_c.c integer_bv_ops_c.c bv_c.c bit_c.c file_c.c bytestrings_c.c gen_strings_c.c strings_c.c ordinals_c.c ordstruct_adt_c.c integertypes_c.c exp2_c.c euclidean_division_c.c real_defs_c.c Rijndael_c.c bytevectors_c.c hex_c.c simplifications_c.c Rijndael_m.c -lgmp
Demo with the ros4healthcare Package
System Overview
This demo shows the Radler code generation and its execution with the ros4healthcare package.
Radler architecture consists of the logical and physical parts. The logical part is specified in terms of node and topic similar to ROS. The nodes execute independently and periodically, and subscribe from and publish to topics. A physical specification is provided by a value of type plant.
In this use case, six Radler nodes (shown as ellipses) communicate via five Radler topics
(shown as rectangles under /healthcare) and several ROS topics
(/rr, /hr, /imu, and /ecg for respiration rate, heart rate, IMU,
and ECG, respectively).
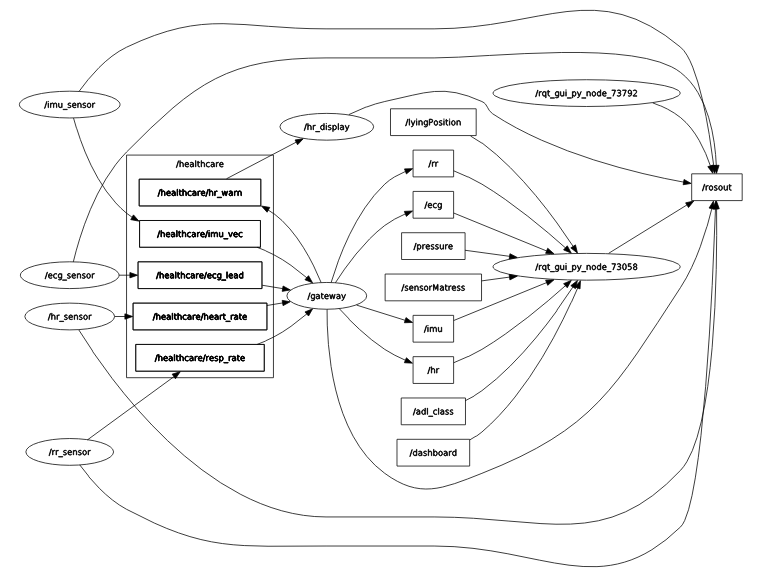
Gateway Node:
Subscribes to four topics (
heart_rate,resp_rate,imu_vec, andecg_lead), executes its step function to check if the heart rate is within the normal range, and publishes to thehr_warnRadler topic to signal thehr_displaynode. It also publishes to ROS message types/rr,/hr,/imu, and/ecgdefined in the ros4healthcare package.Sensor Nodes:
Publish to
resp_rate,heart_rate,imu_vec, andecg_lead, respectively. These nodes simulate physical sensors by generating data points.HR Display Node:
Subscribes to
hr_warn; executes its step function every 100 milliseconds to display any warning signal.Dashboard Node:
Shown as
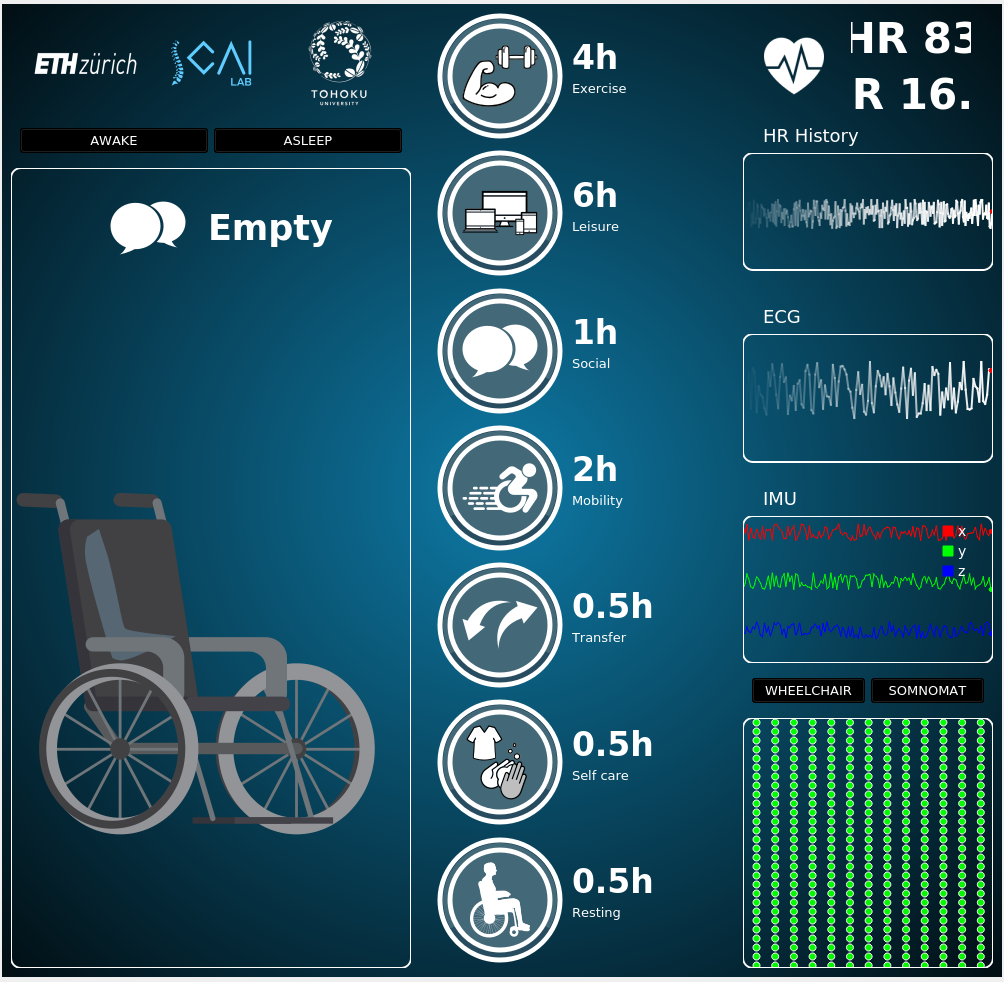
/rqt_gui_py_node_73058in the rqt graph above. It acts as a dashboard, as shown below, subscribing to several ROS topics (e.g.,/rr,/hr,/imu, and/ecg) to visualize them. For more details, refer to ros4healthcare.
Excerpt from the example system’s RADL description below:
heart_rate : topic { FIELDS hr : float32 0 }
resp_rate : topic { FIELDS rr : int32 0 }
imu_vec : topic { FIELDS x : int32 0 y : int32 0 z : int32 0 }
ecg_default : array { SIZE 60 TYPE "int32" VALUES 1 0 0 0 0 0 0 0 0 0 0 0 0 0 0 0 0 0 0 0 0 0 0 0 0 0 0 0 0 0 0 0 0 0 0 0 0 0 0 0 0 0 0 0 0 0 0 0 0 0 0 0 0 0 0 0 0 0 0 60 }
ecg_lead : topic { FIELDS ecg = ecg_default }

hr_warn : topic { FIELDS val : bool false }

gateway : node {
  SUBSCRIBES
    hr { TOPIC heart_rate MAXLATENCY 100msec }
    rr { TOPIC resp_rate MAXLATENCY 100msec }
    imu { TOPIC imu_vec MAXLATENCY 100msec }
    ecg { TOPIC ecg_lead MAXLATENCY 100msec }
  PUBLISHES
    hr_warning { TOPIC hr_warn }
  PERIOD 100msec
  PATH "src"
  CXX { HEADER "gateway.h" FILENAME "gateway.cpp" CLASS "Gateway" LIB sensor_msgs ros_healthcare_msg std_msgs }
}
A node is described with fields such as PERIOD, PUBLISHES, and
SUBSCRIBES. When the gateway node is created, Radler
constructs one instance of the provided C++ class specified in the
CXX field. The step function of this instance will be called at a
fixed frequency defined by the node’s period (the PERIOD field). At
each call, the step function is provided with the messages received from
its subscriptions and is required to write the messages that it has to
publish (the SUBSCRIBES and PUBLISHES fields). A topic is
uniquely defined by its name. For example, heart_rate, rest_rate,
imu_vec, and ecg_lead topics are referenced as
hr, rr, imu, and ecg, respectively. The gateway node publishes to the
hr_warn topic, which is referenced as hr_warning, and the hr_display
node subscribes to that topic. A topic is a purely logical way of defining
point-to-point communications between one producer and multiple
consumers. The communication occurs via bounded latency channel (the MAXLATENCY
field) for each topic.
Below code segment shows the step function of the gateway node,
that is provided by the user (C++ class specified in the CXX field
under the directory specified in the PATH field, as being
exemplified in the RADL description above).
Gateway::Gateway()
{
  node = rclcpp::Node::make_shared("gateway");

  hr_pub = node->create_publisher<ros_healthcare_msg::msg::HR>("hr", rclcpp::SensorDataQoS());
  //...
}
void Gateway::step(const radl_in_t* i, const radl_in_flags_t* i_f, radl_out_t* o, radl_out_flags_t* o_f)
{
  double hr = i->hr->hr;
  int rr = i->rr->rr;

  if (!radl_is_stale(i_f->hr) && !radl_is_timeout(i_f->hr)) {
    rclcpp::spin_some(node);
    ros_healthcare_msg::msg::HR hr_msg;
    hr_msg.hr = hr;
    hr_pub->publish(hr_msg);
    if (hr > 98)
      o->hr_warning->val = true;
    else if (hr < 62)
      o->hr_warning->val = true;
    else
      o->hr_warning->val = false;
  }
  //...
}
A class is instantiated with the default constructor to create an
instance representing the state of the Mealy machine. Subsequently, the
step function of this instance is invoked to execute one step of the
machine. The signature of the step function should specify the input
(radl_in_t*) and output (radl_out_t*) structures define the
node’s subscription and publication, respectively. In the example, the
step function of the gateway node checks whether the sensed heart rate is within the normal range and, if necessary,
publishes a corresponding topic to signal a warning.
Note that the gateway node forwards back-and-forth messages between Radler and ROS worlds by creating a ROS publisher in its
constructor. It publishes ros_healthcare_msg to the corresponding ROS topic and also publishes hr_warning to the Radler topic.
The flag structures
(radl_inflags_t*, radl_outflags_t*) can be used to check if a
subscription is stale or timeout by calling
radl_is_stale(iflag->hr) or
radl_is_timeout(iflag->hr), respectively. By default, these
Boolean metadata attached to messages are propagated through
nodes unless the explicitly being turned off (radl_turn_off).
RADL and Build Process
A system consisting of these nodes was defined using a RADL description, with user code in each node’s step function. The Radler build process generates “glue code” for scheduling, communications, and failure detection, ultimately producing the executables.
To test with Docker
To build the radler/healthcare docker container:
docker build -t radler/healthcare .
To run (on macOS):
docker run -it -e DISPLAY=host.docker.internal:0 radler/healthcare bash
To run (on Xubuntu):
sudo docker run -it -v /tmp/.X11-unix:/tmp/.X11-unix -e DISPLAY=:0 radler/healthcare bash
Within the container:
cd ~/radler/
./radler.sh --ws_dir /tmp/ros2_ws/src compile examples/healthcare/healthcare.radl --plant plant --ROS
cd /tmp/ros2_ws/
colcon build
source install/local_setup.bash
xterm -e "ros2 run healthcare gateway" &      # execute radler gateway
xterm -e "ros2 run healthcare hr_sensor" &    # execute radler nodes, e.g., hr_sensor
ros2 run dashboard dashboard                  # execute ros4health dashboard
Troubleshooting
Error Message:
xhost: unable to open display “host.docker.internal:0”
Steps to Fix:
Open Xquartz settings, go to the Security tab
Make sure “Authenticate connections” is unchecked and “Allow connections from network clients” is checked
Restart Xquartz
Demos using AR.Drone on ROS
This application uses code snippets from the following open source projects.
ROS driver for Parrot AR-Drone 1.0 and 2.0 quadrocopters https://github.com/AutonomyLab/ardrone_autonomy
Modified ARDroneLib based on official ARDroneSDK 2.0.1 https://github.com/AutonomyLab/ardronelib
AR.FreeFlight/AR.Drone 2.0 SDK https://github.com/yolanother/AR.FreeFlight
TensorFlow object detection https://github.com/tensorflow/models/tree/master/research/object_detection
PS-Drone http://www.playsheep.de/drone
Some additional links:
AR.Drone Developer Guide http://www.msh-tools.com/ardrone/ARDrone_Developer_Guide.pdf
Parrot developer site for SDK http://developer.parrot.com/docs/SDK3/#how-to-build-the-sdk
Control the AR.Drone LEDs http://gauth.fr/2011/09/control-the-ar-drone-leds/
For Demos #1 and #2, OpenCV is required to find line with the Hough transform. In .radl file, edit opencv_houghline to enable line detection.
git clone https://github.com/opencv/opencv.git or download source from https://github.com/opencv/opencv/releases/tag/3.4.2
cd /path/to/opencv
mkdir build
cd build
cmake -D CMAKE_BUILD_TYPE=RELEASE -D CMAKE_INSTALL_PREFIX=/usr/local ..
make
sudo make install
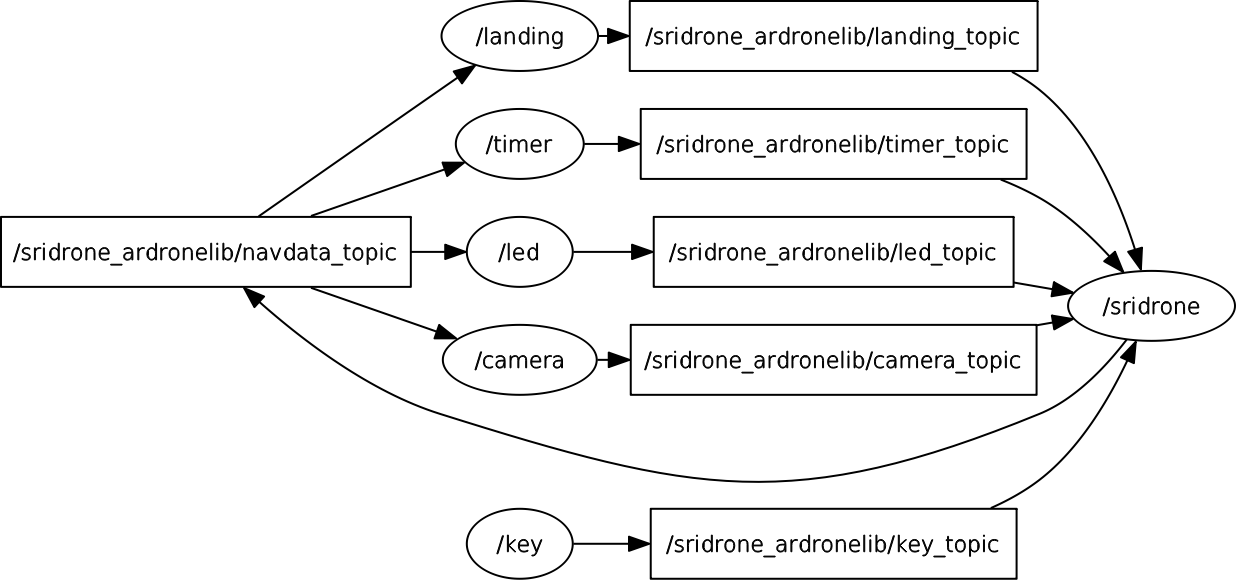
Demo #1 with sridrone_ardronelib
Compile up-to-date ardronelib sdk.
sudo apt-get install libsdl1.2-dev
sudo apt-get install libgtk2.0
git submodule update --init --recursive
cd examples/drone/sridrone_ardronelib/ardronelib
make
sudo make install --makefile=../Makefile INSTALL_PREFIX=/usr/local
Edit drone_ip in examples/drone/sridrone_ardronelib/sridrone_ardronelib.radl with your drone’s IP if needed.
DEFS
   drone_ip: string "192.168.1.xxx"
Run ROS master.
roscore
Run the sridrone_ardronelib example.
mkdir -p /tmp/catkin_ws/src
cd /path/to/radler
./radler.sh --ws_dir /tmp/catkin_ws/src compile examples/drone/sridrone_ardronelib/sridrone_ardronelib.radl --plant plant --ROS
cd /tmp/catkin_ws
catkin_make
cd /tmp/catkin_ws/devel/lib/sridrone_ardronelib
./sridrone
./led
./camera
./key
./timer
./landing
Demo #2 with sridrone_ardrone_autonomy
Download and install ROS ardrone_driver from https://github.com/AutonomyLab/ardrone_autonomy.git.
sudo apt-get install ros-indigo-ardrone-autonomy
sudo apt-get install ros-indigo-image-view
Run ROS master and ardrone_driver.
roscore
rosrun ardrone_autonomy ardrone_driver
Note. Use -ip ${Your Drone’s IP address} if your drone does not have the default IP address.
rosrun ardrone_autonomy ardrone_driver -ip 192.168.1.xxx
Run the sridrone_ardrone_autonomy example.
cd /path/to/radler
./radler.sh --ws_dir /tmp/catkin_ws/src compile examples/drone/sridrone_ardrone_autonomy/sridrone_ardrone_autonomy.radl --plant plant --ROS
cd /tmp/catkin_ws
catkin_make
cd /tmp/catkin_ws/devel/lib/sridrone_ardrone_autonomy
./sridrone
./led
./camera
You can also run ros image_view node to check the camera feed or record it.
rosrun image_view image_view image:=/ardrone/front/image_raw
rosrun image_view image_view image:=/ardrone/bottom/image_raw
rosrun image_view video_recorder image:="/ardrone/front/image_raw" _filename:="/tmp/video_front_camera.avi"
Demo #3 object detection with PS-Drone and TensorFlow
Install Python OpenCV2.
sudo apt-get install python-opencv
Download ps_drone.py and firstVideo.py from http://www.playsheep.de/drone to the same directory (e.g., ps_drone). Test video streaming from AR. Drone using firstVideo.py. A window named PS-Drone with front camera feed should show up. We tested on Ubuntu 14.04.
cd /path/to/ps_drone
python firstVideo.py
Install TensorFlow and related packages. For details, refer https://www.tensorflow.org/install/install_linux.
sudo apt-get install python3-pip
sudo pip3 install -U pip
sudo pip install --upgrade setuptools
sudo pip install --upgrade --target=/usr/lib/python2.7/dist-packages tensorflow
sudo apt-get install --fix-missing python-matplotlib
Download models built with TensorFlow.
git clone https://github.com/tensorflow/tensorflow.git
cd tensorflow
git clone https://github.com/tensorflow/models.git
Download a Single Shot Multibox Detector (SSD) with MobileNet model from here, and untar to /path/to/tensorflow/models/research/object_detection directory.
tar zxvf ssd_mobilenet_v1_coco_11_06_2017.tar.gz -C /path/to/tensorflow/models/research/object_detection
Download and install Protobuf.
git clone https://github.com/google/protobuf.git
sudo apt-get install autoconf libtool
cd protobuf
./autogen.sh
./configure
make
sudo make install
Compile Protobuf libraries.
export LD_LIBRARY_PATH=/usr/local/lib:$LD_LIBRARY_PATH
cd /path/to/tensorflow/models/research
protoc object_detection/protos/*.proto --python_out=.
Add to PYTHONPATH.
export PYTHONPATH=/path/to/ps_drone:/path/to/radler/examples/drone/sridrone_pydrone_tf_obj_detection/src:/path/to/tensorflow/models:/usr/lib/python2.7/dist-packages:$PYTHONPATH
Compile up-to-date ardronelib sdk. Skip this step if you already installed ardronelib sdk for Demo #1.
git submodule update --init --recursive
cd examples/drone/sridrone_ardronelib/ardronelib
make
sudo make install --makefile=../Makefile INSTALL_PREFIX=/usr/local
Edit drone_ip in examples/drone/sridrone_pydrone_tf_obj_detection/sridrone_pydrone_tf_obj_detection.radl with your drone’s IP if needed.
DEFS
   drone_ip: string "192.168.1.xxx"
Run ROS master.
roscore
Compile the sridrone_pydrone_tf_obj_detection example.
mkdir -p /tmp/catkin_ws/src
cd /path/to/radler
./radler.sh --ws_dir /tmp/catkin_ws/src compile examples/drone/sridrone_pydrone_tf_obj_detection/sridrone_pydrone_tf_obj_detection.radl --plant plant --ROS
cd /tmp/catkin_ws
catkin_make
Create symbolic links to find model and label.
cd /tmp/catkin_ws/devel/lib/sridrone_sridrone_pydrone_tf_obj_detection
ln -s /path/to/tensorflow/models/research/object_detection/data .
ln -s /path/to/tensorflow/models/research/object_detection/ssd_mobilenet_v1_coco_11_06_2017 .
Run the example.
./sridrone
./led
Even though the models can detect multiple objects simultaneously, led_anim topic only considers the object with the highest score. Led lights are blinking green (or red) when person (or teddy bear) is detected with the highest score. When dog (or cat) is detected with the highest score, the right (or left) led lights turn red.
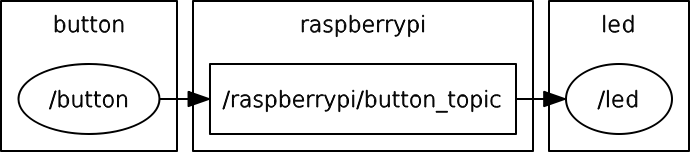
Demos using Raspberry Pi 2/B+
Some additional links:
Raspberry Pi WiFi connection https://learn.adafruit.com/adafruits-raspberry-pi-lesson-3-network-setup/setting-up-wifi-with-raspbian
RPi easy SD card setup http://elinux.org/RPi_Easy_SD_Card_Setup
Raspberry Pi GPIO https://www.raspberrypi.org/documentation/usage/gpio-plus-and-raspi2/
Python on Debian Wheezy http://www.extellisys.com/articles/python-on-debian-wheezy
Preparing your Raspberry Pi
On your host Linux machine, insert the microSD card that comes with Raspberry Pi to extract its disk image.
lsblk
sudo dd bs=4M if=/dev/sdb | gzip > raspbian.img.gz
Now eject the microSD card that comes with Raspberry Pi, and insert a larger microSD card to copy the disk image.
unzip --stdout raspbian.img.gz | sudo dd bs=4M of=/dev/sdb
sudo sync
Boot with a larger microSD to provide enough disk space for this demo (we recommend 16GBytes). Run the following command to expand the disk space.
sudo raspi-config
Installing Radler on Raspberry Pi
Install Python 3.4 on the Raspberry Pi.
sudo apt-get install libncurses5-dev libncursesw5-dev libreadline6-dev
tar -zxf /path/to/your/Python-3.4.3.tgz
cd Python-3.4.3
./configure --prefix=/usr/local/opt/python-3.4.3
make
sudo make install
export PATH=$PATH:/usr/local/opt/python-3.4.3/bin
Install tarjan and pyyaml on the Raspberry Pi.
sudo pip3.4 install tarjan
sudo pip3.4 install pyyaml
Install ROS Indigo on the Raspberry Pi.
Follow the instructions in Step 2 at http://wiki.ros.org/ROSberryPi.
We recommend increasing the swapfile size of Raspberry Pi to 800MBytes (default is 100MBytes) by editing CONF_SWAPSIZE in /etc/dphys-swapfile, and restart dphys-swapfile.
/etc/init.d/dphys-swapfile stop
/etc/init.d/dphys-swapfile start
CMake 2.8.12 or higher is required on the Raspberry Pi.
wget http://www.cmake.org/files/v3.2/cmake-3.2.2.tar.gz
tar xf cmake-3.2.2.tar.gz
cd cmake-3.2.2
./configure
make
sudo apt-get install checkinstall
sudo checkinstall
dpkg -i ~/cmake-3.2.2/cmake_3.2.2-1_armhf.deb
Run the demo on Raspberry Pi
Run ROS master on the Raspberry Pi.
export ROS_MASTER_URI=http://localhost:11311
roscore
Edit target_link_libraries in packagen.py (under ralder/radlr/cgen).
target_link_libraries({lib_target} {lib_static_libs} rt)
Run the raspberrypi example.
mkdir -p /tmp/catkin_ws/src
cd /path/to/radler
./radler.sh --ws_dir /tmp/catkin_ws/src compile examples/raspberrypi/raspberrypi.radl --plant plant --ROS
cd /tmp/catkin_ws
catkin_make
cd /tmp/catkin_ws/devel/lib/raspberrypi
sudo chown -v root.root led
sudo chmod 4755 led
./led
./button
Demos using Android
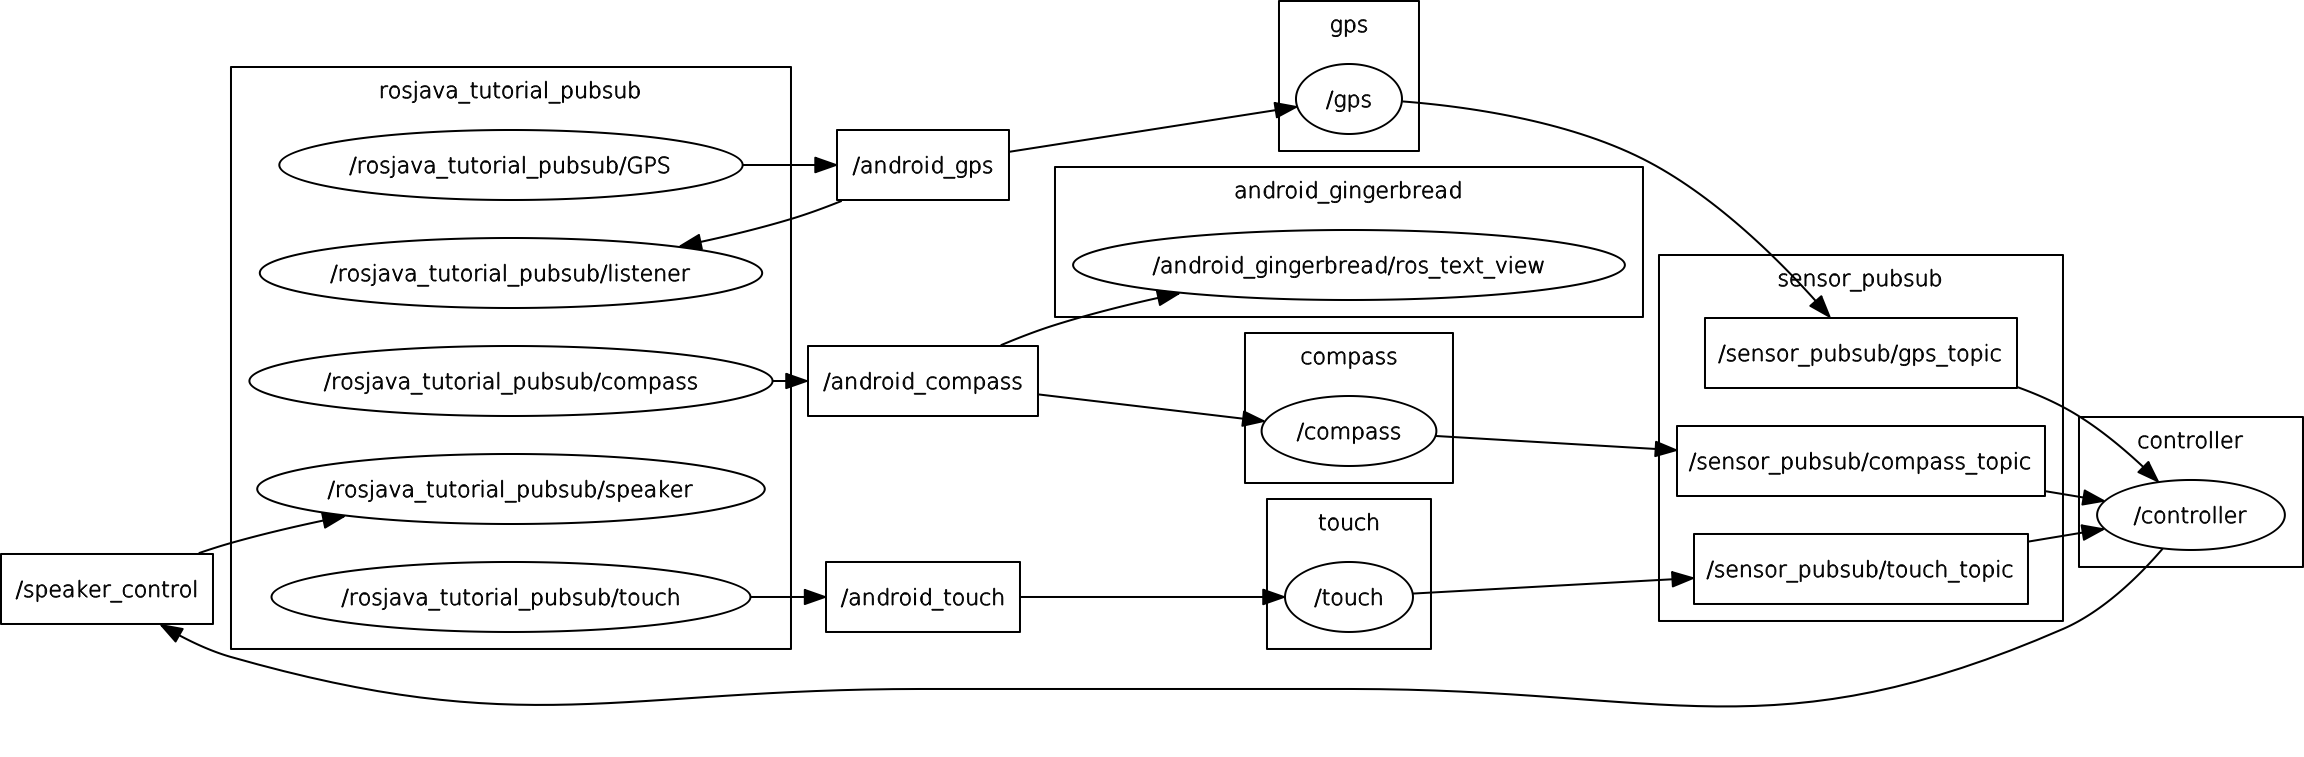
Demo #1 implements sensing (of GPS, compass, touch screen) and controlling (of speaker volume) of Android device via ROS-enabled Android application using Gradle-Android studio environment. This demo is sensing GPS, compass, and touch screen coordinate from Android device, and publishing those under android_gps, android_compass, and android_touch topics, respectively. Radler nodes (named as gps, compass, and touch on the workstation side) are subscribing to corresponding topics and publishing them in Radler world. The controller Radler node subscribes to topics from gps, compass, and touch Radler nodes, and controls volume of the Android ringtone by publishing ROS topic.
Demo #2 implements touchscreen event detection via getevent system command and displays on the window of terminal emulator application.
Some additional links:
Rosjava/android_core https://github.com/rosjava/android_core
Using native ROS code on Android http://wiki.ros.org/android_ndk
Android Studio https://developer.android.com/studio
Android NDK https://developer.android.com/ndk
Demo #1 Sensing and controlling of Android device via ROS-enabled Android application using Gradle-Android studio environment
Our example included in android_core directory is based on the tutorial example (android_tutorial_pubsub) from https://github.com/rosjava/android_core.
Install Android studio, and import android_core project to compile/generate/install signed apk file via Android studio (recommended).
Alternatively, you can use Gradle command as below.
cd /path/to/radler/examples/android/android_core
Edit sdk.dir in local.properties.
sdk.dir=/path/to/android/sdk
Execute a build with the Wrapper.
sudo ./gradlew
If you are not using Android studio, you need to sign your unsigned apk android_tutorial_pubsub-release-unsigned.apk under android_tutorial_pubsub/build/output/apk, and install signed apk.
cd /path/to/radler/examples/android/android_core/android_tutorial_pubsub/build/output/apk
keytool -genkey -v -keystore debug.keystore -alias radler -keyalg RSA -keysize 2048 -validity 20000
jarsigner -verbose -keystore debug.keystore android_tutorial_pubsub-release-unsigned.apk radler
adb install  android_tutorial_pubsub-release-unsigned.apk
For ease of testing, USB tethering can be used. Note that USB tethering is not required for deployment.
Enable USB tethering mode on your Android device. ifconfig on your workstation will show you the usb0 interface.
usb0  Link encap:Ethernet  HWaddr xx:xx:xx:xx:xx:xx
      inet addr:192.168.42.11  Bcast:192.168.42.255  Mask:255.255.255.0
Set environment variables on your workstation.
export ROS_MASTER_URI=http://192.168.42.11:11311
export ROS_HOSTNAME=192.168.42.11
Run ROS master on your workstation.
roscore
Edit master_ip in examples/android/sensor_pubsub/sensor_pubsub.radl if needed.
DEFS
   master_ip: string "192.168.42.11"
Run the sensor_pubsub example. Note that when you open a new terminal to run Radler nodes, set environment variables (i.e., ROS_MASTER_URI and ROS_HOSTNAME).
mkdir -p /tmp/catkin_ws/src
cd /path/to/radler
./radler.sh --ws_dir /tmp/catkin_ws/src compile examples/android/sensor_pubsub/sensor_pubsub.radl --plant plant --ROS
cd /tmp/catkin_ws
catkin_make
cd /tmp/catkin_ws/devel/lib/sensor_pubsub
./gps
./compass
./touch
./controller
When you start PubSubTutorial application on your Android device, enter Master_URI as your workstation IP (192.168.42.11 in this demo). You can now observe your compass and GPS coordinates on the top of the screen. When you touch the screen, the ringtone sound will be played with volume that is proportional to the ratio of current x-coordinate and screen width.
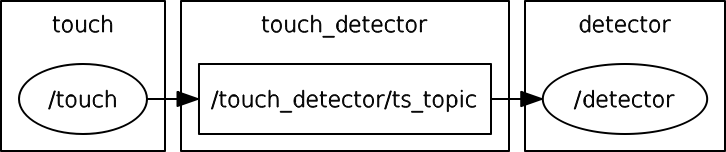
Demo #2 Touchscreen event detector using Android NDK
Prepare build environment to build native ROS nodes using the Android NDK as described in http://wiki.ros.org/android_ndk/Tutorials/BuildingNativeROSPackages. do_docker.sh takes some time to complete.
git clone https://github.com/ekumenlabs/roscpp_android.git
cd roscpp_android
./do_docker.sh
Copy do_radler.sh script to the Docker workspace for cross compilation of Radler nodes.
cp /path/to/radler/examples/android/do_radler.sh /path/to/roscpp_android/
Edit android_ip and master_ip in examples/android/touch_detector/touch_detector.radl if needed. The android_ip is your Android device’s IP (192.168.42.129 in this demo). The master_ip is your workstation’s IP (i.e., Ubuntu machine where you run ROS master; 192.168.42.11 in this demo). Refer to http://wiki.ros.org/ROS/EnvironmentVariables for further explanation.
DEFS
   android_ip: string "192.168.42.129"
   master_ip: string "192.168.42.11"
Set environment variables on your workstation.
export ROS_MASTER_URI=http://192.168.42.11:11311
export ROS_HOSTNAME=192.168.42.11
Run ROS master on your workstation.
roscore
Compile the touch_detector example.
cd /path/to/radler
./radler.sh --ws_dir=/path/to/roscpp_android/output/catkin_ws/src compile examples/android/touch_detector/touch_detector.radl --plant plant --ROS
sudo docker run --rm=true -t -v /path/to/roscpp_android:/opt/roscpp_android -v /path/to/roscpp_android/output:/opt/roscpp_output -i ekumenlabs/rosndk /opt/roscpp_android/do_radler.sh /opt/roscpp_output
Copy Radler nodes for the touch_detector example.
cd /path/to/roscpp_android/output/catkin_ws/devel/lib/touch_detector
adb push touch /data/data
adb push detector /data/data
Run touch Radler node on your Android device. On your workstation, connect to you Android device via ADB.
adb shell
su
mount -o rw,remount /
export ROS_MASTER_URI=http://192.168.42.11:11311
export ROS_HOSTNAME=192.168.42.129
cd /data/data
./touch
Run detector Radler node.
adb shell
su
export ROS_MASTER_URI=http://192.168.42.11:11311
export ROS_HOSTNAME=192.168.42.129
cd /data/data
./detector
Alternatively, run Radler node on your Android device. Download an Android application (.apk) for Terminal Emulator for Android (e.g., https://github.com/jackpal/Android-Terminal-Emulator), and run it on your Android device. On the terminal emulator, run the following commands.
su
export ROS_MASTER_URI=http://192.168.42.11:11311
export ROS_HOSTNAME=192.168.42.129
cd /data/data
./detector
Now you will see O on both windows (i.e., Android Terminal Emulator and ADB shell) when you touch your Android’s screen. Otherwise X will be displayed.
Radler language specification
File constraints
A radl description file is a text file, preferably encoded in utf8, with extension “.radl”. Such a file is called in short a radl file.
Meta syntax rules
A radl file define a module whose name is the file name. A module is a set of value declarations. A declaration may be an alias, used to declare a value equal to another one but with a new name. The name of a value may be omitted, note that it’ll prevent the user to reference this value. The type of a value may also be omitted, note that if the type is ambiguous, the inference will choose one. When defining a class field, one may declare a new value or refer to another value by its identifier.
Grammar
module := decl*
decl := alias | NAME? (':' TYPE)? TYPEVALUE | NAME? (':' CLASS)? class_value
alias := NAME = identifier
class_value := '{' field * '}'
field := FIELDNAME value +
value := identifier | decl
identifier := root_name | identifier '.' NAME
root_name := NAME
Grammar terminals
The NAME terminal is a spaceless word beginning with a letter which
may contain numbers and underscore (the regex
[a-zA-Z][a-zA-Z0-9_]*). NAME is also restricted not to be a
keyword, or begin with ‘radl’. The other terminals are defined by the
language.py file, with
declarations of the form
'type' TYPE 'REGEX' TYPEVALUE
and
'class' CLASS (FIELDNAME (TYPE|CLASS) ('*'|'+'|'?')?)*
Keywords
Keywords are all TYPE, CLASS and FIELDNAME plus the
extra_keywords entry of
language.py.
White spaces
The syntax requires all terminals to be whitespace separated. A whitespace is any number greater than 1 of space, tabulation and end of line.
Identifier scoping rules
Scoping regions
A file MODULE.radl defines an implicit scoping region for its
content whose name is MODULE. Sub-regions are defined by class
values. A class value declaration defines one and only one nested
scoping region, syntactically delimited by matching braces, whose name
is the declaration NAME.
Local unicity of names
Inside each region (not comprising its sub-regions), NAME of each
declarations are unique. Moreover, each module name MODULE is
ensured to be unique.
Global unicity of qualified names
A qualified name (qname) is an identifier whose root_name is a
module name. By unicity of module names and declaration names, a qname
defines a value uniquely.
Resolution of identifiers to qualified names
When resolving an identifier, the first step is the resolution of its
root_name, which is matched with the closest enclosing scoping region
or in the last resort to another module name. At that point, the
root_name is replaced by the qualified name of its matching region
and the identifier becomes a qualified name.
Example
---- file: module1.radl ----
x : int32 0
s : struct { FIELDS x : int32 42 }
----------------------------
This file declares three values whose qnames are module1.x,
module1.s and module1.s.x.
---- file: module2.radl ----
x : int32 0
s : struct { FIELDS
    x : int32 0
    s2 : struct { FIELDS
        y = x
        y2 = s.x
        y3 = module2.s.x
        z = module2.x
        a = module1.s.x
    }
}
----------------------------
This file declares nine values whose qnames are module2.x,
module2.s, module2.s.x, midule2.s.s2, module2.s.s2.y,
module2.s.s2.y2, module2.s.s2.y3, module2.s.s2.z, and
module2.s.s2.a. When defining the alias y = x, the identifier
x is resolved by looking for a name x defined in s2 (which
doesn’t exist) then in the enclosing region s where it is found,
thus resolving to module2.s.x. s.x in the declaration of y2
is resolved to the same qname by first resolving s to module2.s
and replacing it to get module2.s.x. When resolving the identifiers
module2.s.x, module2.x, and module1.s.x, the root_name is
found to be a module name meaning that these identifiers are already
qualified names.
Shadowing
While using qualified names for identifiers permit to overcome most possible shadowings, a region will shadow any module with identical name.
Example
--- file: module3.radl ---

module1 : struct { FIELDS
    y = module1.x
}
--------------------------
In this file, the resolution of module1.x will result in
module3.module1.x since the closest enclosing region named
module1 is the one defined in module3. Thus the definition of
the struct named module1 shadows the actual module module1.
Note that in this example, since module3.module1.x isn’t
declared, the compiler will complain that it is missing.
Radler language
Logical level
The two main classes used to describe the logical level are node and topic. Their full definitions may be found in language.py. The most important elements are:
class node
    PUBLISHES publication *
    SUBSCRIBES subscription *
    CXX cxx_class
    PERIOD duration
    WCET duration
class topic
    FIELDS int8/uint8/int16/uint16/int32/uint32/int64/uint64/
           float32/float64/
           bool/struct/array/duration/time +
Nodes
When creating a node, Radler will construct one instance of the
provided C++ class (the CXX field). The step method of this
instance will be called at a fixed frequency defined by the node’s
period (the PERIOD field). This step function needs to be proven
to have a worst case execution time no greater than the one described
here in the WCET field. At each call, the step function is
provided with the messages received from its subscriptions and is
required to write the messages it has to publish.
Topics
A topic (defined uniquely by its name) is a purely logical way to define point-to-point communications between one producer and multiple consumers. There can be exactly one node publishing to a topic while many nodes can subscribe to it.
External files and PATH
File reference
An external file is described by a string representing its path. This path may be absolute (for example “/etc/example.cfg”) or relative (“src/defs.h”). Relative paths are resolved relatively to the working directory of the scoping region. Absolute path files are not recommended, but may be useful in very specific cases.
Working directory of a region, PATH and MODULE_BASE_PATH
If a PATH field exists in a region, it is used to set the working
directory of this region relatively to the parent region’s working
directory. The module working directory is the directory of the
module file except when it is redefined by the MODULE_BASE_PATH
of the module_settings value.
Example
---- file: path1.radl ----
n: node {
    PATH "nodes/example"
    CXX { PATH "src" FILENAME "n.cpp" }
}
--------------------------
Considering that path1.radl is in “/tmp/pathexample”, the working
directory inside the region n is “/tmp/pathexample/nodes/example”
and the file referred by “n.cpp” is
“/tmp/pathexample/nodes/example/src/n.cpp”
---- file: path2.radl ----
n: node {
    PATH "nodes/example"
    CXX { PATH "src" FILENAME "n.cpp" }
}
settings : module_settings {
    MODULE_BASE_PATH "/usr/pathexample"
}
--------------------------
By adding this module_settings value, “n.cpp” refers to
“/usr/pathexample/nodes/example/src/n.cpp”.
Libraries
Any user code needing libraries has to be declared as using a library
with the LIB field. This field allows two forms of libraries,
cmake_library and static_library.
Static library
Static libraries are of the simplest form, gathering a set of source
files in their CXX field while the library header files are found
in the HEADER_PATHS paths.
Cmake library
The cmake library enables the use of arbitrarily complex libraries
since it is a user defined cmake script. The CMAKE_MODULE field
provide the cmake module name used to find it in the working
directory. COMPONENTS are the required components from this
module, used when calling the cmake find_module command. By
default, it is expected that the module defines two variables named
${CMAKE_MODULE}_LIBRARIES and ${CMAKE_MODULE}_INCLUDE_DIRS
defining respectively the libraries to be linked against and the
include directories. Both variable names can be specified if their
naming doesn’t follow this convention, respectively with the fields
CMAKE_VAR_LIBRARIES and CMAKE_VAR_INCLUDE_DIRS.
Typing
Inference
When a value is type annotated, it is checked to be of this type. If no type annotation is provided, the kind of the value is extracted from the ones possible in the value declaration context. If there is an ambiguity, it chooses the first relevant one in the order of declaration in language.py.
Checking
User values are checked to be correct with their type with the
function check_type found in
language.py.
Subtyping
Subtyping allows for example to use a 16bits integer (int16)
where a 32bits integer is required (int32). For now, subtyping is
only done on sized_types by allowing a type to be used in a
bigger version. sized_types and possible sizes are explicit in
language.py. User values
are checked to fit the type’s size with the function
check_type_size.
User code
Compilation
Include directories
The generated code is setup so that user code is compiled with the necessary include folders, i.e., the specified library header folders and the working directory of the file references.
Compiler definitions
The user code is compiled with the following definitions:
IN_RADL_GENERATED_CONTEXT: The basic definition to detect if the code is compiled within Radler compilation chain.RADL_NODE_NAME: The name of the current radl node.RADL_NODE_QNAME: Which is set to the node qname (with dot separators, for example “modulename.nodename”).RADL_MODULE_NAME: The name of the current radl module.RADL_MODULE: A pointer to the current module ast root.RADL_HEADER: The radl generated header to be included by the user code (defining input and output data types).RADL_STATE: The radl default name to be used for the C state type (if not specified in the radl file).RADL_STEP_FUN: The default name to be used for the C step function (if not specified in the radl file).RADL_INIT_FUN: The default name to be used for the C init function (if not specified in the radl file).RADL_FINISH_FUN: The default name to be used for the C finish function (if not specified in the radl file).
C++ node definition
Each node is a Mealy machine. The user provide a class which will be
instantiated with the default constructor to generate an instance
representing the state of the machine. Then, the step method of this
instance will be called to execute one step of the machine. The
signature of the step method is required to be:
void step(const radl_in_t*, const radl_inflags_t*, radl_out_t*, radl_outflags_t*)
The four argument types are structures defined in the generated header file.
The input structure radl_in_t
This structure has one field per subscription of the node. The field
name is the radl name of the subscription. Each field is in turn a
structure reflecting the topic of the subscription, whose fields are
the name of the radl topic FIELDS.
The output structure radl_out_t
It is similar to the input structure except that is is used by the step function to publish its publications. To this effect, the step function has to fill the output structure.
The flag structures radl_in_flags_t, radl_out_flags_t
Similarly to the input and output structures, these have a field for
each subscription (resp. publication). The type of each field is a
radl_flags_t as described in
radl_flags.h.
C node definition
This is the same as the C++ case, except that instead of a class, the user needs to provide 4 things. To describe them, we use the default names provided by radl, but those may be decided in the radl file.
A state type, that we call
RADL_STATEhereAn init function of signature :
void RADL_INIT_FUN(RADL_STATE *)A step function of signature :
void RADL_STEP_FUN(RADL_STATE *, const radl_in_t*, const radl_inflags_t*, radl_out_t*, radl_outflags_t*)A finish function of signature :
void RADL_FINISH_FUN(RADL_STATE *)
The flags
Computation of the output flags
The main idea of flags is to have some Boolean metadata attached to messages, which by default propagate through nodes. To this effect, the default value of the output flags of each publication of a node are set to the logical OR of all the flags of its subscriptions, equivalent to the following pseudocode:
v = 0;
for each s in subscriptions:
    v = v OR in_flags->s
for each p in publications:
    out_flags->p = v
Then, the input flags are given to the step function as read-only while the preset output flags are provided to the step function to give it a chance to turn on or off the desired flags. So, if the step function doesn’t change the output flags, they will propagate the input flags.
Computation of the input flag radl_STALE
The so-called stale flag has the broad meaning that its associated
value isn’t “fresh”. More precisely, it either means that the
publisher of the value flagged it as stale (by automatic propagation
or by choice) or that no new message arrived since the last call to
the step function. In the latter case, the step function gets the
same input value (the mailbox hasn’t changed) but it is flagged as
stale. To check if a subscription s is stale, one simply calls
radl_is_stale(in_flags->s) which returns a Boolean.
Computation of the input flag radl_TIMEOUT
The so-called timeout flag has the broad meaning that its associated
value has violated the timing constraints. More precisely, it either
means that the publisher of the value flagged it as timeout (by
automatic propagation or by choice) or that we haven’t received a
message since period of the publisher plus the maxlatency. In the
latter case, timing constraints are exceeded and something unexpected
is happening. To check if a subscription s is timeout, one simply
calls radl_is_timeout(in_flags->s) which returns a Boolean.
Turning off/on output flags
The function radl_turn_on is used to turn on a flag. For example
to turn on the stale flag of the publication p, we would do:
radl_turn_on(rald_STALE, &out_flags->p);
To turn off flags, the similar function rald_turn_off should be
used.
Introspection
To allow more robust and generic user code, it is possible to access values defined in the radl description.
Modules root entries
The generic way of doing so is to use the generated module root ast
access functions. For example if we want to read the radl value of
qname module1.x, one will first call the radlast_module1
function to get to the module root entry.
Shortcuts
Instead of needing to know the current module name and call the
corresponding root ast access function, one can use the provided
macro RADL_MODULE. When writing a step function, one can directly
access the node it is used in by using the RADL_THIS macro.
Field access
The generic rule is that fields of values are the names of the declared value inside this value. This name is in turn
a pointer to the value (the generic case)
the value itself (for a
topic, astructor inside them).
The DEFS field
To allow the user to define values which are not radl relevant, but
that should be statically defined and shared, we added the DEFS
field in the node and topic classes.
Example
Consider the following radl description:
---- file: introspec.radl ----
x : int32 1
t : topic { FIELDS
    a : int32 2
}
n : node {
    DEFS
        y : int32 3
        s : struct { FIELDS
            z : int32 4
        }
    PATH working_dir "nodes/example"
    CXX { PATH "src" FILENAME "n.cpp" }
}
----------------------------
In the user code, if one wants to get the value of x (1):
*(radlast_introspec()->x)
or
*(RADL_MODULE->x)
Note the indirection, since we are in the generic case, the field
x is a pointer to its value. To access a, since it is inside
a topic, we don’t need the indirection:
RADL_MODULE->t.a
Note that t is a topic so it is not a pointer, its field are
accessed directly. This also applies to any other value, for example
to read “nodes/example”, one will do:
*(RADL_MODULE->n->working_dir)
or, when writing the step function for n:
*(RADL_THIS->working_dir)
Note that in order to access this value, we gave it a name in the
radl description. Finally, to sum it up, to access z when
writing the step function of n:
RADL_THIS->s.z
Comments
After
#, any character is discarded up to the end of line.